The Problem
Here’s the thing… 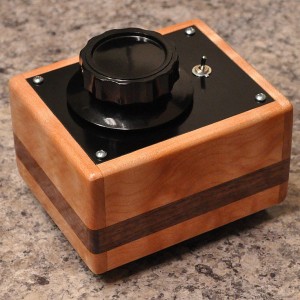 When you are building different amps and preamps, you want to listen to different ones all the time. You end up switching different units in and out, reconnecting things, basically reconfiguring all the time. Invaraibly, at some point you are going to want a nice simple volume control to adjust a level. This is not necessarly as simple as it may sound. You need to consider impedances, grounding, type of attenuation, method of connection, ease of use, etc. So I decided that I needed to tackle this problem.
The Electrical Design
Now if I was going to build a control like this, I wanted a couple of inputs so that I could easily switch sources and compare things. I also didn’t want to induce any ground loops by adding this control. This drove me to the schematic you see here.
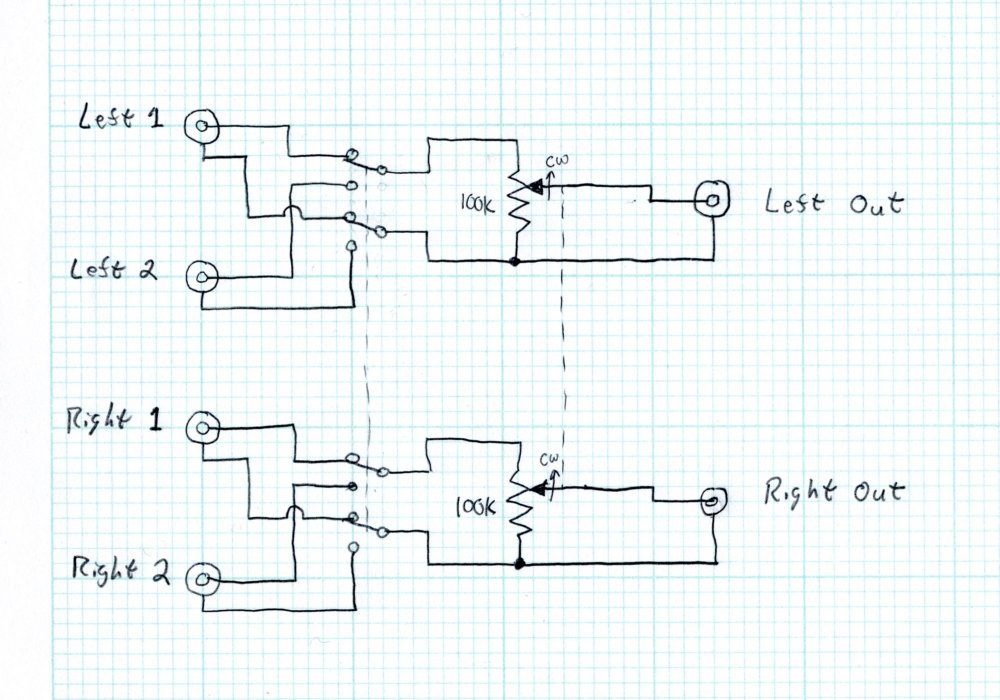 You’ll notice that this schematic has a couple of good things going for it. First, it completely isolates the left and right channels. There is no electrical connection between them and no was to cross up the ground lines. Second, each of the two inputs are also isolated from each other. This means that there is never any ground sharing between the different sources.
This unit is intended to be used with the tube equipment that I build and this is what drove me to the choice of the 100kΩ resistive elements. I didn’t want the control unduly loaded by the amplifier to which it is connected. Now depending on control position, the output impedance will start at 0Ω then increase to a peak value given in the following equation, and then fall (assuming the source impedance is less than 100kΩ) to the value of the source impedance shunted by a 100kΩ resistor.
Using the rule that the load should be at least four times the output impedance, this means that the amplifier to which the control is connected should have an input impedance of over 100kΩ. How much over is dependent on the output impedance of the source.
I also don’t want the control to overload the source to which it’s connected. This time, at the zero volume position, the input impedance will be the 100kΩ total resistance. And at full volume, the input impedance will be the 100kΩ resistance shunted by the input impedance of the following amplifier. So if we assume the amplifier has an impedance of at least 100kΩ as we just calculated, and assuming the rule that the load should be at least four times the output impedance, this means that our sources should have a maximum output impedance of approximately 12.5kΩ.
Usually these limitations are not an issue. If the sources are solid state virtually all devices will have an output impedance significantly lower than 12.5kΩ. Even with tube stages, for a bypassed common cathode stage the output impedance is the parallel combination of the plate resistance and the load resistance. For very high µ triodes (like the 12AX7 or the 6SL7) this might be a problem, but most line driver stages will have significantly lower output impedance than this limit.
The Build
The other thing I didn’t want was a noisy control. So I decided to go with a stepped attenuator using metal film resistors. These are available all over the internet and I chose this one for $18 USD a piece. 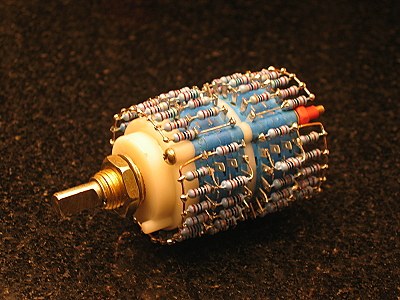 This is 100kΩ stereo audio taper unit on a 26 position switch. The switch is fairly stiff but with a larger control knob this shouldn’t be too much of a problem.
I also need to remember to keep my grounds separated. So I chose gold plated RCA jacks that are insulated from the mounting surface. This meant that I could still use my favorite construction technique, wood with aluminum plates for the electrical components. I also selected a small form factor 4PDT switch to select inputs.
After choosing a nice piece of curly maple and some dark walnut for inlay and then cutting and painting some aluminum, I set forward on the construction. Here is a view of the insides before putting the bottom on the chassis.
It was a little cramped but every thing went alright. Here is the finished unit showing the back where all the electrical connections are made.
 The knob I chose was a 2-1/4″ equipment control knob off an old piece of radio equipment. It’s large size gives a torque advantage that helps overcome the stiffness of the switching action.
The Results
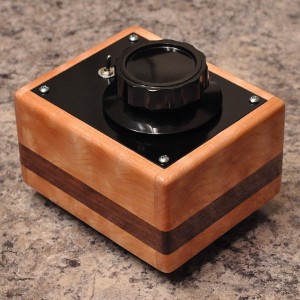 I like it! This little unit is dead quiet and it also gives me the opportunity to put the volume control right next to my chair when the amp is still sitting several feet away. Selecting different sources is as simple as flipping the tiny switch. I tested the control with the inputs driven by a computer sound card and an iPod connected through the dock connector. The output was connected to a very quiet vacuum tube amplifier with ah input impedance of 100kΩ. With both inputs playing there was no popping or noise when switching from one input to the other. This was a fun little project. It looks nice, works well, and allows me greater flexibility using my equipment. What more could I ask for?


Are these stepped potentiometers linear or more of an audio taper? Dan
In general you can specify at the time of purchase. Most of the ones I’ve seen are audio taper.
I ran across one of these in 100k and am thinking about making one like yours, but the taper seemed steep when I measured it on the LCR. So, I wanted to ask before trying to build anything. I know you said space was tight, but what is the inside measurement of your box.
The inside measurement of my box is 4-3/8″ by 3-3/8″.It is just about 3″ tall so about 2-7/8″ inside between the top and bottom plates. Also note that for a proper audio taper potentiometer a 50% shaft rotation only equates to a 10% resistance setting.
Appreciate the help, especially with the note about the taper which matches my measurements. On a side note, besides the stiffness, are there problems with using these on an amp the way you did with the 6EM7?
They do tend to be rather switch like in their action. This is one of the reasons I used large knobs so that it was easier to apply the necessary torque. There are some people that recommend taking the control apart to lessen or remove the indent mechanism strength. (Beware, Here there be Dragons!) I have not tried this. There really aren’t any other issues with using these (other than their size). They wire into the circuit in the same way as a potentiometer and the perform the same function.
I have not seriously looked at switched attenuators since building these two projects. These days I am more than satisfied with a nice APLS or PEC control. I find that in a properly designed circuit, the noise figure difference is not noticeable.
Love this project. What would the schematic look like for balanced inputs and outputs?
For a balance design, you’ll need to insert matching potentiometers in each leg of the balanced signal. These are tied together at the channel ground. So for stereo, you’ll need a gang of 4 potentiometers.
Molto interessante! lo costruirò per me.
(Very interesting! I will build it for me.)
Hi,
Would a switch at the end of the output will alter the circuit.
It would be nice to add a mute button or a dimmer.
Can’t wait to start this project!
Thanks for your time and sharing this!
all the best!
Yes, a mute switch on the output would be fine. I would wire it with dummy loads like this.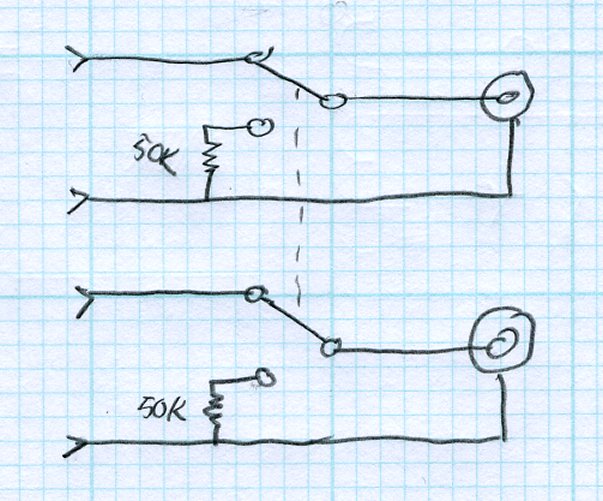 Some amps don’t like open circuits inputs and this will make it quieter.
Matt
Hi Matt.
Great looking amp. I am building this Lacewood amp.
I have one question…what is that 2.58 K resistor > cannot find, can
you offer a substitute> This amp is going to be an easy build, to
your layout. I have located all the parts accept that resistor. Thanks
and keep up the excellent work at showing us how to build.
William; The 2.85 resistor serves as part of the lowpass filter with the 47µf capacitor. The value is not critical and any value between 2kΩ and 4kΩ should be fine is this application.
Matt,
Thank-you for sharing your insight to folks in the DIY audio community. I’m new to audio design, but have a pretty solid background in electronics.
A question that comes to my mind regarding input level audio control is why use resistors at all? My idea is to use an op amp between the input device and tube and then control volume with a variable gain resistor. Utilizing an op amp will offer a high impedance to the input device. There is the added complexity of powering and implementing the op amp. Like I said I’m new to the community so the intent of my post is to gain guidance. I understand that I am likely missing a concept.
Terry;
The short answer to your inquiry is “simplicity”.
Active stages also provide excellent volume control and have other advantages. These include far fewer restrictions on input and output impedances, active input switching, simple input channel to channel fading, etc. Really once you make the decision to go active, there are a whole set of things that can be done well. However, these things come with the cost of complexity.
The goal here was to keep the control simple. And with just a stepped attenuator made from metal film resistors, construction is simple, channel isolation is guaranteed, and the noise figure is at least 10 to 20dB lower than most active stages. I have nothing against active mixing and level control, it just wasn’t the point of this project.
wow, this is great. i’m curious if you’d be willing to wire me up a design with TT jacks, i could build the wood case myself, but would LOVE to have something like this as an insert in my patchbay for matching levels.
Glad you like the unit. Sorry but I don’t normally do projects for hire. If you complete the box though, then the rest should be no problem. You should give the project a try.
Great build! I’m trying to do something similar but am getting mixing information about the value of the control. I’m going with a ladder type attenuator. My phono preamp has an output impedance of 300 ohms and my amp has an input impedance of 47k. The amp originally had a 100k volume control located at the inputs which has been bypassed. I was thinking 100k would be a fine choice but I’m concerned about HF roll-off and also loading down the source too much.
There are really two rules to follow. If you follow them both, then there is actually a lot of latitude too chose the value you use. The first is that the control shouldn’t load down the source. Your source has an output impedance of 300Ω so any value above about four times that, or 1200Ω is acceptable. The second rule is that the amp input should not be unduly loaded by the control. this means that the peak output impedance should be less than 1/4 of the amp input impedance or 11,750Ω. It is important to remember that the output impedance of the volume control will be variable but will peak at the sum of the preamp output impedance and the control divided by four. Calculating, 300Ω/4 = 75Ω (too small to worry about) and the control can be 4*11,750Ω = 47kΩ. So, strictly speaking, any control between 1200Ω and 47kΩ is acceptable.
However, you have indicated that the amp originally had a 100kΩ volume control on the input that had been “bypassed”. So depending on the nature of that bypass you may be just fine with the 100kΩ control (which will result in a peak output impedance that the amps sees of 25,075Ω). I think you’ll be ok with the 100kΩ control.
Hi Matt,
I love your volume control and I would like to have your suggestions and your help to realize such a thing for Multichannel Monitoring (ie: 5.1, 7.1) and obviously with Multichannel switching.
Waiting for your welcome reply, I send you my best regards.
For multi channel switching, you definitely want to use a rotary switch with enough platters (i.e. poles) to handle all your signals. To do it like I did here, you’ll need two platters for each channel. And enough positions for the number of inputs you have. As for the volume control, follow the impedance guidelines above, and decide how you want the volume controlled. For a 5.1 system, I would use a dual control for the L/R front channels, a dual control for the L/R rear channels, and a single control for the subwoofer. This should allow you to balance the surround sound nicely.
Saw this on DIYAudioProjects website and like the look of it.
Wasn’t sure whether I could use this directly between a phono preamp (that has no control of output) and my 1960’s Quad2 monoblocks, leaving my Transcendent GG pre-amplifier out of the picture completely?
I find that if I have vinyl playing through phono preamp + pre-amp + power amps I have to wind volume control on the pre-amp virtually down to nothing or suffer ear-ache!!
J
Jay;
In general I would say that it would probably work just fine. The limiting factor is going to be the input impedance of your mono-blocks. The phono preamp should have a very low output impedance. As such if you choose an attenuator that is somewhat lower impedance than your mono-block input impedance, I would think that all should work as designed.
Matt