Let’s Try Again…
This is my second attempt at building my first operational headphone amp. It actually turned out much better then my first attempt. If you have read “The First Amp” you already know that I had some initial problems. But making mistakes is alright so long as we learn from them. And I did. For this amp I used the lessons I had gleaned from my first attempt. I spread things out more on the chassis and I inserted some more carefully thought out shielding. I also paid much more attention to my grounding scheme. The results were much better.
The Layouts…
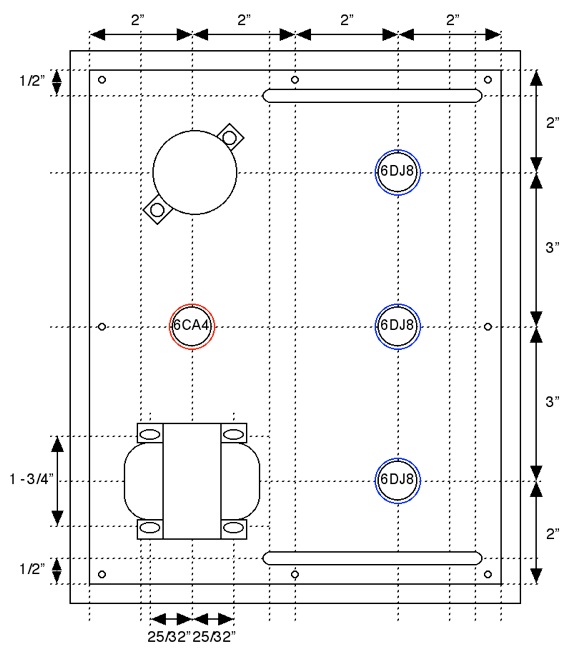
For this try I still wanted the layout to be simple. I also wanted to add some reasonable spacing between the tubes so that interactions were simpler to avoid. I used the same approach I used for the first amp. A plate of aluminum for mounting the components on top of a walnut chassis. In fact, the amp looks remarkably similar to the first one only more spread out. Here is the layout for the top plate.
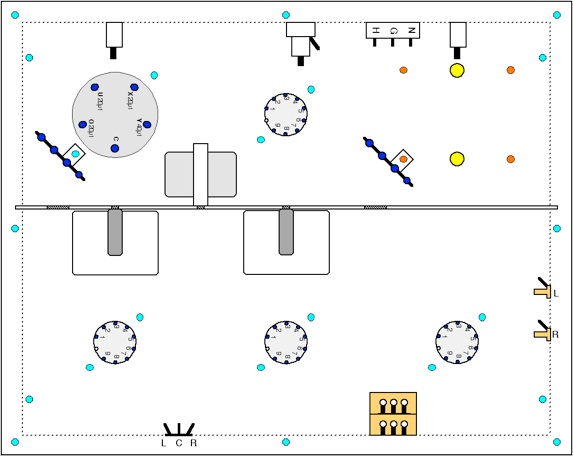
Again the amp is eight inches deep however it is twice as wide as the first amp; ten inches instead of five. This allows for a simple linear layout of the signal tubes and provides plenty of internal space for component wiring. Again, limiting unwanted interactions is my primary goal in this layout. The interior layout for this amp shows how much more open and accessible things are.
This time, there is a physical separation between the noisy AC power sections and the signal sections of the amp. The divider down the center is a sheet of aluminum with one penetration for the filament wiring and a second for the high voltage plate supply lines. The output capacitors are mounted on the signal side of the shield and the power supply inductor (increased to 2H for this design) is mounted on the power supply side. What is not shown on this diagram is the addition of a hum shield across the front inside of the chassis. With the top plate, the bottom of the amp, the divider, and the hum shield, the amp electronics are shielded on four of six sides with grounded aluminum plates. This will also help to minimize interaction between the power supply and the signal electronics.
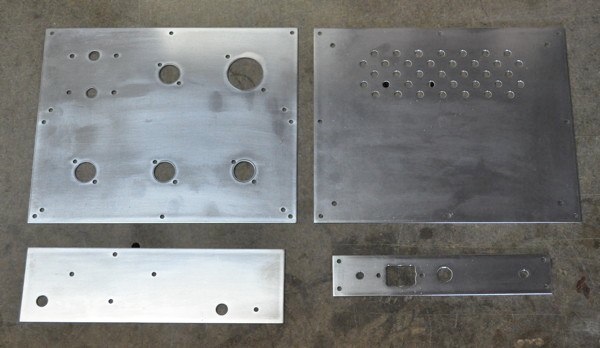
If anyone were to ask what is the greatest difference between this amp and the first one, I would have to say the amount of metal around the electronics. As can be seen in the photo below, this design required a considerably larger amount of aluminum than the first one.
On the top left is the top plate drilled for the major components and on the top right is the chassis bottom cover with some vent holes to help keep the power section cool. Below left is the divider plate drilled to take the output capacitor clips and the power supply filter choke. Below right is the rear plate which takes the power cord receptacle, the fuse holder, and the two switches. The hum shield is not shown above but is almost identical in size to the divider plate. Over all,a lot more metal went in to this amp than the first one.
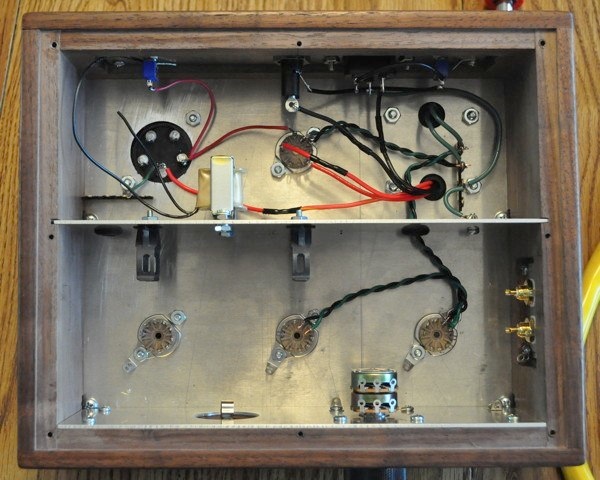
As can be seen in this photo taken while I was wiring up the amp. There is much more space to keep things separated.
In this photo, the primary side of the power transformer is completely wired, as is the high voltage secondary for the rectifier tube and the first filter cap. This was taken as I was wiring up the filaments for the three signal tubes. There is actually another major benefit to making the chassis larger. There is much more space to reach into it to work. And anything that makes amp building easier is going to make it more enjoyable as well.
The Schematics…
After I analyzed the failure with my first amp attempt, I was convinced it had nothing to do with the schematic design and everything to do with the implementation of that schematic. Because of that, this amplifier was built using the same schematics as before, with one small exception. The power supply filter choke for this design was raised to 2H. I did this to more evenly balance ripple currents between the two filter capacitors. This yielded a two fold improvement in overall ripple performance for the power supply; a much larger improvement then would have been expected from just the increased inductance alone. For completeness, I’ll include the schematic diagrams here as well.
Again, there is nothing new about these schematics. The amplifier is Chu Moy’s schematic from the Headwize website and the power supply is the same as before except for the choke value being raised to 2H.
The Results…
Let me begin by saying that this amp is an unqualified success. Fed by my iPod or my portable CD player it sounds incredible. Rich lows, clean pure highs, full bodied tone like I have never heard through a straight transistor signal path. I set up a test where I could bypass the amp while being driven by my iPod in less then a second. This allowed me to rapidly switch back and fourth to compare musical sound quality. This amp is a definite improvement over either the iPod or CD player alone. Even in a blind test with my son doing the switching, I could clearly tell the difference.
For my 18 year old son this was an eye opening experience. He had never heard the sound of a well constructed tube amplifier having lived his life entirely in the era of transistors. Watching his eyes as he switched from song to song was really something to see. With my first successful amp I made a real convert.
Now this amplifier sits on top of a short book shelf just a few feet from my leather recliner along with a pair of Sony V6 headphones. This way I can sit back, close my eyes, and rediscover music that I haven’t truly heard in years.



Hi Matt,
I am looking to Build the Recovery version of your design as my first attempt. I was wondering what your preferred Capacity Manufacturer you like for your projects? Since I am looking to do a stereo implementation; I would need to have a cap w/two 470uf terminals for the L/R out correct?
Thanks!
Jason
This is an older design and I have largely stoped building output transformer less (i.e. OTL) headphone amplifiers. The reason for this has to do with the sensitivity of modern headphones to DC bias and the difficulty in keeping this value small in all phases of operation. I would suggest that you pursue the 6DJ8 Headphone Amp as it’s a better design and suffers no output bias issues.
However, If you really want to build this amplifier, it is necessary to acquire very low leakage current capacitors for the 470 µf output capacitors. I would look for ones that limit the leakage current to no more than about 20µA. The Vishay series 36D/36DE/36DX electrolytic capacitors meet this requirement and are of good quality. I would also suggest that you do not plug in your headphones until the B+ has been stably for at least 30s to let the capacitors come to their quiescent operating condition.
Can you make amplifier class D Vacuum tubes?? Thank you sir
It is entirely possible to build a class-D amplifier with vacuum tubes. However, it is a major project to do so and the results would likely be so similar to a modern class-D amplifier that there is really not much point to the whole exercise.
Thank you for sharing your work, it’s been very helpful.
One question, if I could: What is the black cylinder at the back of your amp?
Thanks,
Jim
The black cylinder is a multi-section electrolytic capacitor. This is used in the power supply filter. The part in question is a JJ part number “TC 549 40+20+20+20” with four separate capacitor sections all with a common negative terminal.
Hey Thanks! Thank you for making this site and sharing, I really appreciate it and for answering my question. You are a very generous person.
Dear sir,
I have good results in eliminating the hum by adding a resistor of 43-47 ohm between the each filament pins of the first stage tube and the ground. My question here is if this could give the possibility to eliminate the inductance of 2H from the power supply.
Thank you again,
Lucian
Actually no. There are three main ways for hum to get into an amp. One is excessive ripple the B+ supply. Another is poor ground coupling of the heater circuits. And the third is poor lead routing inside the amp.
The fix you recommend will help with heater circuit grounding, but it will have no effect on B+ supply ripple level. The 2H choke is needed to limit this B+ ripple.
Dear sir,
what is your opinion in using led biasing on this amp, I mean eliminate the resistor and capacitor on the cathode with a red led? Is it worth doing? If yes, can it be made in both stages or only in the preamp stage?
Thank you in advance,
Lucian
Actually, I would not recommend it in this amp. This is a direct coupled design and the bias points have been very carefully chosen. I’m not sure how things would work if the biasing design was changed in this fashion.
Hi!
I have several questions:
1) I have a 260-0-260V (+6.3V) Transformer, and an EZ80 rectifier tube. What changes do I need to make to the schematic for optimal results?
2) Can I use 6N1P or 6N23P tubes? I found them on ebay for quite cheap.
3) Can this amp drive a 150R headphone?
Thanks!
p.s.: Your projects are awesome. I’ve just recently discovered your website, and I’m already loving it!
To take your questions in reverse order.
This amp should have no problem whatsoever driving 150Ω headphones. As to the tube types I strongly recommend JJ E88CC tubes with this design. See my answer to your previous question for a more detailed explanation.
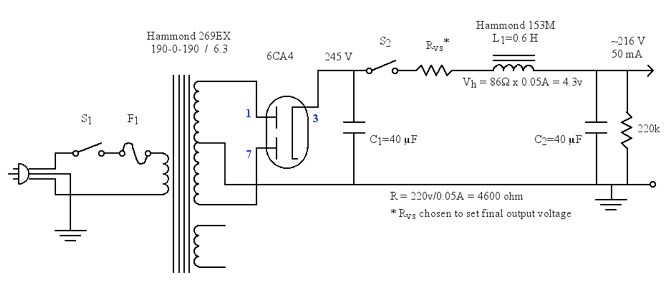
The main issue with your power transformer will be that the power supply output voltage will be far too high. The amp draws about 50mA and at this level your B+ voltage will likely be well over 300v. The amp only requires about 220v so you would need a dropping resistor of at least (300-220)/0.05 ≈ 1.6kΩ (≧ 4W). You’ll need to use a dummy load of about 4.5KΩ (10W) to test the power supply voltage and determine the exact dropping resistor required.
Interesting and simple circuit, using a White cathode follower as output stage. Is it suitable to drive low impedance headphones, like 32 ohms Grados? Has it enough power to drive them? I’m building a tube phono stage, the modified RCA’s schematic, which has plenty of output for being tube-based. Would it be a good match for this little amp? Thank you, and nice website.
The original design was to drive 32Ω headphones. It should drive your Grados without a problem.
Thanks!!
Hello:
Can I substitute 6DJ8 for 12AU7? in the Recovery headphone amp?
I understand the filament changes.
Thanks
Actually, even with the wiring changes to get the pin mapping correct, this simply won’t work. The circuit in question is designed for the specific characteristics of the 6DJ8. A change to the 12AU7 would require a complete redesign of the White Cathode follower output stage.
Dear Matt,
I’m about the same age as you, I learned electronics 30 years ago, and I’m now back to it during my free time, trying to build tube amps. I’m right now setting up my lab, your work and site is inspiring, thanks for publishing all these nice pictures !
A question regarding your wood-work: are your boxen walls made of one or two layers ? Eg on this pic, http://wp.cascadetubes.com/wp-content/uploads/2013/08/tr_inside.jpg, do you glue two layers together to get the recessed internal surface to support the front-plate ?
or are walls in one piece and milled ? and if so, what tool do you use ?
Thx in advance !
Charles
Thanks for the nice words
As to the chassis, they are one piece about 3/4″ thick. There are 1/8″ deep recesses milled down one side to hold the top and bottom plates. The trick to building ring frames like this is to start with one piece of wood about 3/4″ thick and as wide as you want the chassis tall. It needs to be long enough to cut all four sides plus a few inches. After the stock is square and true, I use the table saw to cut recesses down both sides which are about 1/8″ deep and exactly one half the thickness of the piece. Then cut the short sides to the exact dimension of the top and bottom plate short sides and the long pieces exactly one board thickness longer than the long side of the top and bottom plate. Then on the back (inside) side of the long pieces, cut cross grain rabbits on the ends one half thickness deep and wide enough to accommodate the full thickness of the short sides. When glued up, the corners will fit together just like the picture.
If you look carefully at the picture, you’ll notice that the side grain goes just to the edges of the recess on the long sides. It is actually easier to see in this picture here. http://wp.cascadetubes.com/wp-content/uploads/2013/08/inside.jpg
I hope this helps.
Matt, you have been very helpfull to describe how you build your cases, thanks a lot, I will try in a few weeks after I have found the pieces and tools. Thx a million !
Hi Matt,
I was thinking about building this amp with some tubes I had left from a previous project. Would it be okay to use 12AX7 tubes instead of the ones indicated in the schematic ?
Thanks
Chris;
Unfortunately this design is really tuned to the 6DJ8 tubes. The white cathode follower will not work with a 12AX7 and if used in the preamp socket, the bias for the output stage will be wrong. The 12AX7 is really not suitable for this design. Sorry.
Different Chris but similar questions:
I’m having a hard time finding 6DJ8/ECC88 tubes for relatively cheap, can the 6DJ8’s be replaced with 6922’s in this circuit with similar performance or will some values of Rs and Cs need to be adjusted? Looking at this write up of the white cathode follower http://www.tubecad.com/october99/page4.html which also uses 6DJ8’s as an example it looks as though the only values to be adjusted are Ra, Rk, and RL based on mu and Rp of the tube (are the C’s then determined such that they won’t over filter?). Is this correct or is it more complicated than that?
Thanks much for any and all help, I’ve really appreciated your detailed write-ups.
It is in fact much simpler. The 6DJ8, ECC88, E88CC, and 6922 can all be used interchangeably in this circuit. As for tube suppliers, you can get brand new JJ 6DJ8s from tube depot (https://tubedepot.com) for $13.95 USD as of this writing.
Just for reference, I have always found the Electro-Harmonics tubes noisy in this circuit. I would avoid that brand if possible,
Hi!
Would these 6N23P or 6N1P tubes work? If yes, what would be the main difference regarding to the amp’s operation?
https://www.ebay.com/itm/Lot-of-8-pcs-6N23P-Audio-Triode-Tubes-ECC88-6922-6DJ8-Used-See-Variations-/132376120255
https://www.ebay.com/itm/Lot-of-8-pcs-6N1P-EV-VI-Triode-Tubes-ECC88-6922-6DJ8-NOS-See-Variations-/132425387283
Thanks!
P.s. I love your tutorials, they are very well composed
The 6N23P should work with the amp. But I will caution that that this particular direct coupled design is rather sensitive to tube variations. Although the 6N23P (6H23П) is a direct “replacement” for the 6DJ8 I only tried this design with part marked 6DJ8s or E88CC and it definitely worked best with new JJ E88CC (6922/6DJ8 industrial equivalent).
I’m just getting into tube audio, with my first component being a small tube pre-amp for my turntable. I was wondering if this headphone amp would work using my pre-amp outputs, or could I just use my turntable outputs?
It’s been years since I’ve done much soldering or kit building, and this looks like something that might help me get comfortable again before diving into one of your power amps. I absolutely love your vertical amp, gorgeous design and execution.
Dream big or go home, right?
This amp will work great with your preamp outputs. It has line level inputs so it should be well matched. It will not work with your turntable outputs because the phono preamp used with the turntable contains the RIAA equalization required to convert from the cartridge output to line level flat frequency signals.
I’m glad you like the projects here on the site. Inspiration is where you find it. Let us know how your build goes.
Hi Matt,
Really cool build! Any ideas for places to get good tube-audio chassis? I look through catalogs on Mouser/Digikey and get super overwhelmed and rarely find anything I like. Not much of a wood worker either, so that’s kind of out as well. Thanks for your very helpful website!
Ben
Actually Antique Electronics Supply (www.tubesandmore.com) has a full line of Hammond enclosures from small die cast boxes to full size amp chassis, some with wooden end plates. They come in aluminum or steel and provide a wide choice for whatever you’d like to build.
Hello Mr. Renaud I have attempted a kit, to miserable results! I am convinced that even the simplest of kits, still require basic knowledge of electronics. I must admit that I lack the basics and till I learn, will remain mystified as to how it works. Though I appreciate live music, with the gear I posses, re-produced music fails to re-ignite the passion once enjoyed from the original! Okay to the point! Please tell me how to connect two things: Stereo selector switch and Stereo volume control? I have problem getting from drawing (schematic) to physical realization.
I hope I can help. Lets start with the volume control. The following are two images of the volume control on the Recovery Amp. The first is a picture with the appropriate wires labeled, the second is a schematic with like labels. Note the circled numbers on the potentiometer terminals on both pictures.
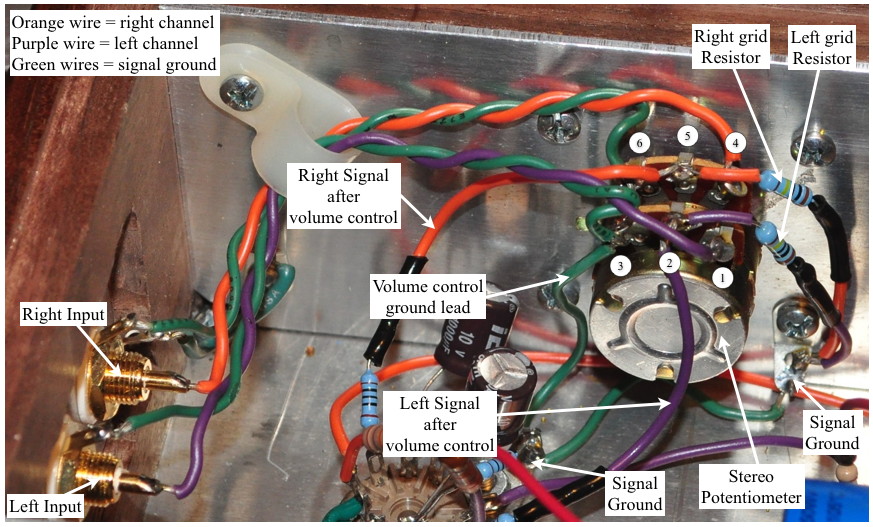
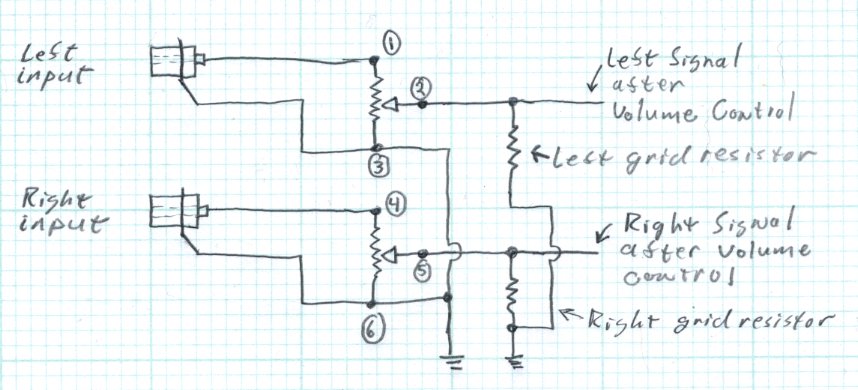
Take a look at these two diagrams and see if the wiring makes more sense.
Hi (another) fellow electrical engineer,
Nice website. I am impressed by your work and the careful description of it. Nice casings too. However, IMHO I think there is a lot to discover for you, if you, instead of using iPod or a portable CD player, would use a very good programme source. Last year I switched almost exclusively to listening music through a very good sound card in my computer (24 bits/96 kHz). Still everyday I am surprised and glad about that. If you already use ‘better’ than iPod, let me know what your experiences are. Would be nice. BTW…I am thinking about building a passive stepped attenuator, to replace my Quad 34 preamp (no need to switch sources anymore).
Hi fellow electrical engineer,
I have been studying your designs and builds and they are really interesting. I’m planning to build your headphone tube amp. Where do you buy the parts? Any suggestion will be very well received. Thanks.
I buy most of my components on-line. Basic electronic components can be had from distributers like Allied Electronics, Arrow Electronics, Mouser, or Digikey. For vacuum tube specific parts like sockets, tubes, transformers, etc. I like to buy from Tube Depot (www.TubeDepot.com), The Tube Store (www.thetubestore.com), or Antique Electronic Supply (www.tubesandmore.com). Also, I particularly like Edcor power and output transformers (www.edcorusa.com). Their quality is second to none.