Simulations and Prototypes
When I first started building electronic circuits, the word “simulation” carried with it a much different context than it does today. Intel had just introduced its 4004/8008 micro processors and most computers were still things that sat in special air conditioned rooms being tended by full time operators. Simulation was something NASA did to predict aerodynamic forces. It was something the DoE did to predict shock waves from nuclear weapons. It was definitely NOT something circuit designers routinely did to determine if their circuits would work before building them. In those days, if you wanted to see how a circuit would perform, you built it. Consequently circuit designers often spent as much time in the lab as at their desks. All of this activity even led to the evolution of development terms like “proof of concept”, “breadboard”, “brassboard”, and “preproduction unit”.
Additionally, all of this prototyping activity was actually a very good thing for the designers. It served to provide context to the designs and the factors that affect them. Using this approach, circuit designers developed an intuitive feel for design that just doesn’t come along with simulation. They knew that just because the circuit was designed for B+=250v didn’t mean that it wouldn’t work acceptably at 235 volts or 265 volts. And they had a good feel for how it would behave under these conditions. They learned that layout could be just as important as circuit paths. And they began to understand the subtleties of real circuit operation as opposed to just the theory.
Fast forward to today. Now we have computers everywhere, SPICE circuit simulation, and component models for all kinds of tubes. It is a simple matter to grab a circuit, begin plugging in circuit values and voltages, and see what happens in the simulation. Some people actually get very good at this. Arriving at circuits that are operational and stable but never really understanding what actually makes the circuit work. There is a saying attributed to a U2 pilot and commander concerning simulation. The saying goes “Simulation is like masturbation, if you do it long enough you begin to think it’s the real thing.” And this goes to the very root of the problem with simulation. It’s not real. And while simulation may be a good tool to perform preliminary investigations, it is no replacement for the real thing.
So, as a matter of principle, I am a “prototyper”. I would much rather wire up a cathode follower I designed and experiment with how it works, then run simulations. I think I learn more with my prototype circuits then I do with simulations; and I definitely enjoy it more. And that, after all, is the whole point.
Approaches to Prototyping
There really is no wrong way to prototype a circuit. Obviously some methods may yield better results than others, but just about any method is valid. Over the years I have built prototypes by simply wiring loose components together, I have mounted circuits on pieces of wood, plastic, and metal, and I have used standard protoboards into which you simply push components. I’ve used simple “perf” board, I have used foil circuit boards which were prototypes in their own right, and I’ve used dedicated prototyping stations designed for a specific types of circuits. In every case, regardless of the method, I learned more about my circuit than I ever could have with a simple simulation.
The only caveat I would put on this discussion is that safety must always be a consideration. Voltages above 70v can be fatal. As such, what ever prototyping method you use, it should be laid out such that you won’t inadvertently come into contact with high voltages. And even low voltages like filament supplies can overheat underpowered resistors which can cause burns and even fires.
It is for these safety reasons why, for prototype tube circuits, I prefer to use a dedicated simulation station like the one shown below.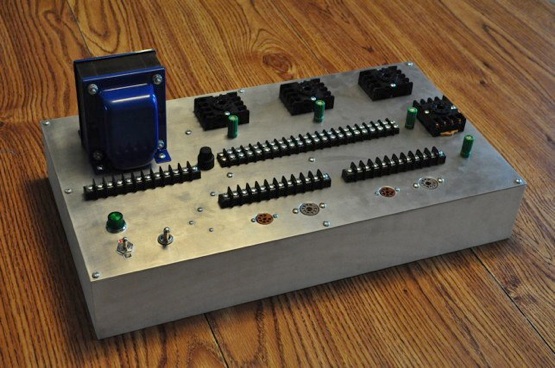
This unit allows me to use a variety of common tube types with their pins brought out to screw type terminals. It has a twenty element dual terminal strip down the center for mounting components and contains a common signal ground bus separate from the chassis ground. It also provides both 5vac and 6.3vac filament supplies and +260vdc and +390vdc high voltage supplies on separate switches. Using this unit I can safely prototype a variety of tube circuits from a simple amplifier stage to a complete push-pull output stage with phase splitter driver.
A Prototyping Example
One of the projects I’m working on is a simple stereo amp with single ended 6V6 ultra-linear output stages. For driver stage I decided to use a 6SN7 dual triode to develop the +/- 12.5v peak-to-peak I’ll need to drive the 6V6s. This presents an excellent opportunity to prototype the input stage and check it for gain, bandwidth, and stability.
Obviously, the first step was designing the driver stage. The stage will use about a +250v B+ voltage and only requires moderate gain. So I started with a simple load line design using values of components I had handy.
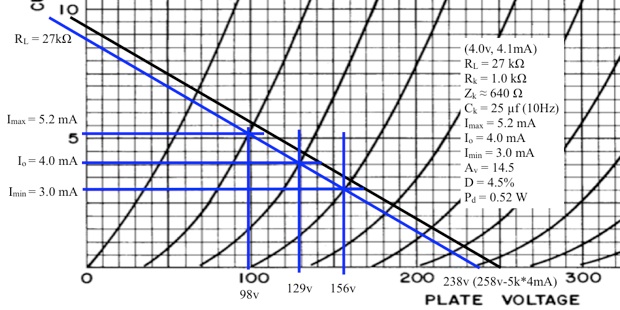
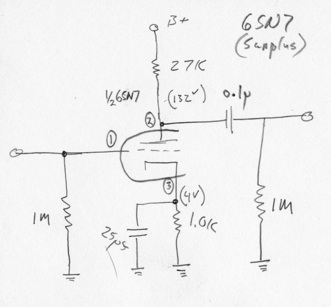
This load line shows the initial stage design for the amplifier. The black line is the design line and the blue load line assumes the power supply from the prototyping station. These lines are close enough that I don’t expect the AC performance of the stage to vary by more then a few percent. I chose a cathode bypass capacitor that gave about a 10Hz 3dB roll off with the 640Ω total cathode impedance, so at 20Hz the loss should be just a tenth of a dB or so. From this data I drew up the schematic for the simple circuit.
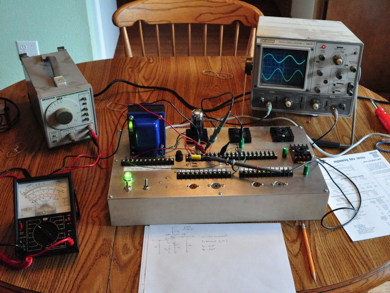
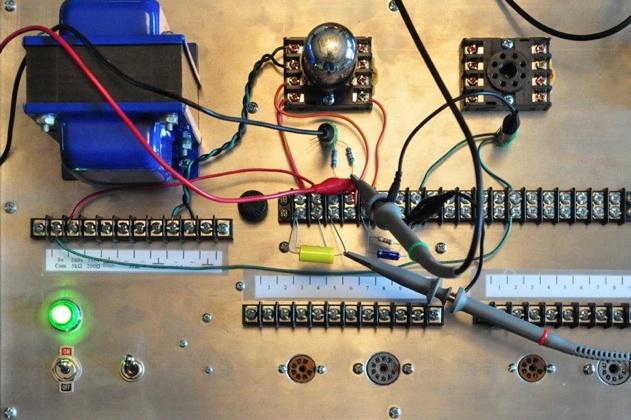
The coupling capacitor / 1MΩ resistor pair on the output both blocks the plate voltage and simulates the input load of the following stage. From the load line I estimated the bias point at -4v and the cathode to plate voltage at 129v so the total plate voltage should be 129v + 4v = 132v. All that was left at this point was to wire up the prototype. The following picture shows the circuit all wired up and operating with the test equipment connected.
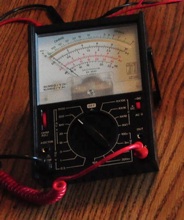
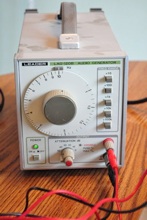
The input signal comes in via the red and black leads over the top of the transformer, the green coded oscilloscope probe monitors the circuit input, and the red coded probe monitors the output. The first thing I did was check the bias point. The plate lead voltage was 132v just as I had calculated. The cathode bias was 4.2v but this is only a 5% variation from the design point so that’s OK as well. The test equipment used here was simply a volt meter, an audio signal generator, and a dual trace oscilloscope.
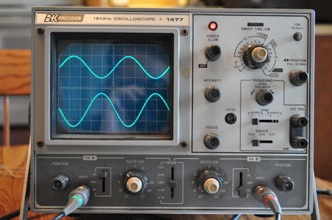
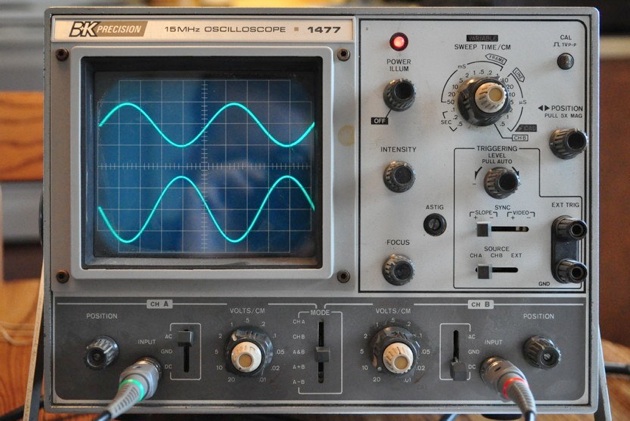
I set the signal generator for a 1kHz sine wave with a peak amplitude of 1 volt. I set up the scope to show the input on the upper trace and the output on the lower trace. In this way I could calculate the gain as I varied the frequency across the audio band. Below is a close up of the face of the oscilloscope at 1kHz.
The input channel (upper trace) is set for 1 volt per division and clearly shows the input sine wave with a peak value of one volt. The output channel (lower trace) is set for 10 volts per division and shows the output sine wave (properly inverted) with a peak value of 14v. This gives an overall amplification factor of 14 v/v (23 dBv). From the load line design I had calculated a gain of 14.5 (or about 23.23 dBv) so the prototype is with 3.6% of the design point which is a pretty good result.
By varying the input frequency and keeping the input magnitude constant I was able to determine the gain across the entire audio band. The amplifier had a low frequency roll off exactly where it was supposed to be and the gain was constant to within about 0.25 dBv from 15Hz to over 50kHz. This is a excellent result especially considering the stray capacitance of all the wires on the prototyping station. Properly constructed on a real amplifier chassis this performance should be easy to replicate.
Conclusions From The Example
The simple prototype I built in this example showed me exactly what I could expect for this driver stage. It used real components and showed minor variation because of that fact. It also gave me a certain level of confidence in both my design ability and the probability of the final circuit behaving as expected. I could have used a simple simulation to do the same thing but I would not have gained the intrinsic “hands on” knowledge that comes with prototyping nor the confidence that seeing the circuit actually working brings.
Now don’t get me wrong. I do use simulation for some things. For checking out a circuit concept or investigating how certain parameters vary in a particular circuit, simulation can be invaluable. But it must be used carefully and, at least in my opinion, sparingly. We need to make sure that we don’t ever forget that simulation really isn’t “the real thing”.

Hello Matt,
I just built my first amp (Fender 5F2) and I’m hooked. I’ve searched high and low for a guide to building a tube amp prototyping station, and then I stumbled upon your site!
Do you have a basic parts list for the unit? What power supplies are you using?
Any additional recommendations you can make would be fantastic.
Thanks!
The parts for this station are a rather eclectic mix. The octal sockets are DIN relay sockets like these from IDEC. The 7 and 9 pin sockets are just tube sockets wired underneath to the line of screw terminals. The line of screw terminals down the middle are just for connecting components. Here’s how the unit looks from underneath.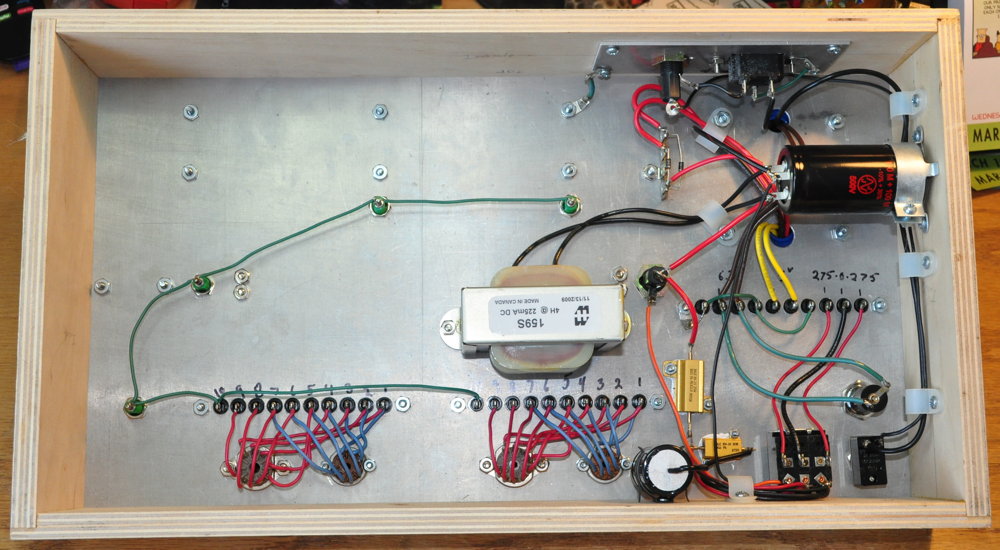
Frankly, the power supply I included proved to be too limited. I currently use an old Heathkit IP-17 variable power supply. I also have a B&K 1671 power supply to give me filament voltages other than 6.3 and 12.6 volts. You can build a stand alone supply high voltage supply that has a couple of voltages or try to find a variable HV supply on ebay.
My recommendation is to build a unit that suits your needs. Three octal sockets and two 7 or 9 pin sockets has always been enough for most of what I do. However I’ve never been satisfied with the screw terminal for mounting components. I would recommend a good sized common “proto-board” like one of these in the center. Just remember to isolate high voltages with a row if empty sockets.
Let me know if you have any other questions.
Thank you for the reply. Very helpful.
Awesome work. I have read several of your articles, and those sources pointed me here. Thanks for taking the time. I am 63. I play guitar, and am an electrician by trade. I wanted to work on guitar amps when I was young. Had to go back to school, which was not in the cards, so I became an electrician. For the last 10 years I have gotten back into fixing tube guitar amps, built a couple, and find the information you possess has been quite an positive influence on my learning.
Thank you,
Steve Smithson
I frequently use LT Spice to test designs, and it works well. But, I guess not surprisingly, when I actually plug parts into a breadboard and start testing, I find that the measured performance is a lot closer to my calculations than Spice says.
So, as you say, simulation is good, but not a substitute for the real thing.
Plus, hands-on electronics is a heck of a lot more fun and educational than just clicking a circuit into a computer.
I’m a guitarist, studio engineer and frustrated amp builder.
I like what you’re presenting here and you are encouraging me to re-up my efforts. In short I think you are on the right track.
Like your prototype chassis.
Did you think about a layer of say plastic over the top surface to protect from parts and body from shorting to ground?
I’m glad you like the site. If you’re interested in guitar amplifiers I strongly suggest the two books by Richard Kuehel (http://www.amazon.com/Richard-Kuehnel/e/B002M91X94/ref=sr_ntt_srch_lnk_10?qid=1411921789&sr=1-10) on guitar amp design. They are very good.
As to the prototype board, actually the bare aluminum plate is there as a safety measure. It is directly tied to the chassis ground. That way any lose connections cannot inadvertently energize any metal parts and I remain protected even with high voltage on the board. Of course, that’s not to say that I don’t follow proper safety rules very closely. I’ve been bitten by high voltage before and the experience (and subsequent recovery) was very unpleasant! 😉
hi
i like your prototype board , do you have any instruction on building one
cheers
den
I don’t have any formal instructions. I just placed items where I thought they would be useful and added a simple power supply. Frankly, were I to do it again, I would not include the power supply but use a standalone unit for PS prototyping and a separate PS for audio circuit prototyping. This would make it more versatile.