An Exercise in Reuse
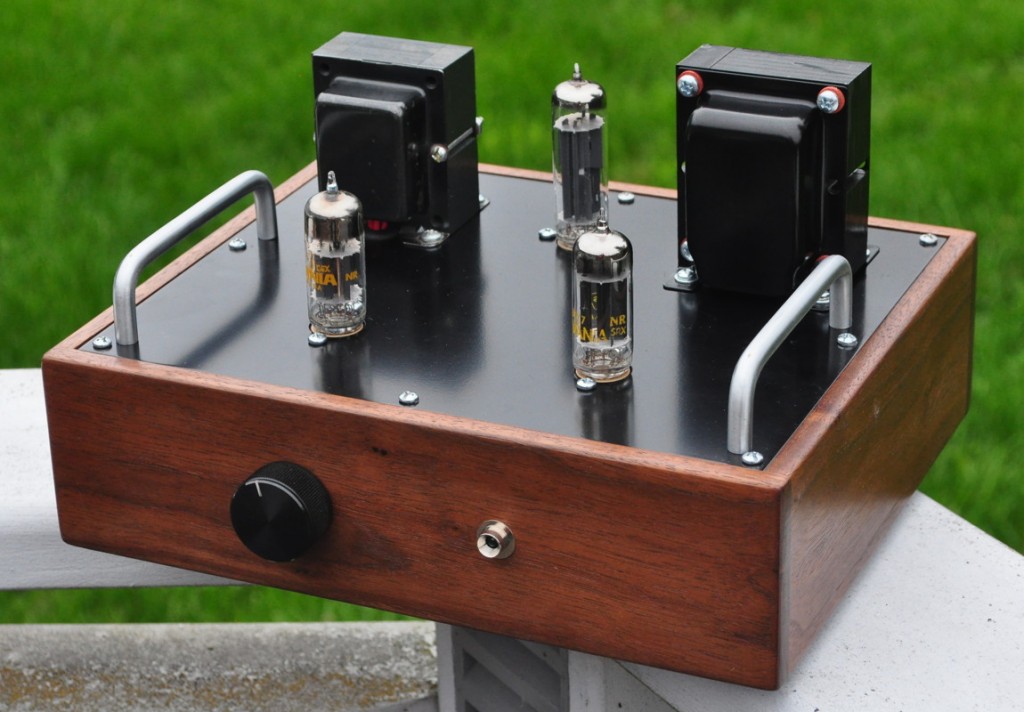
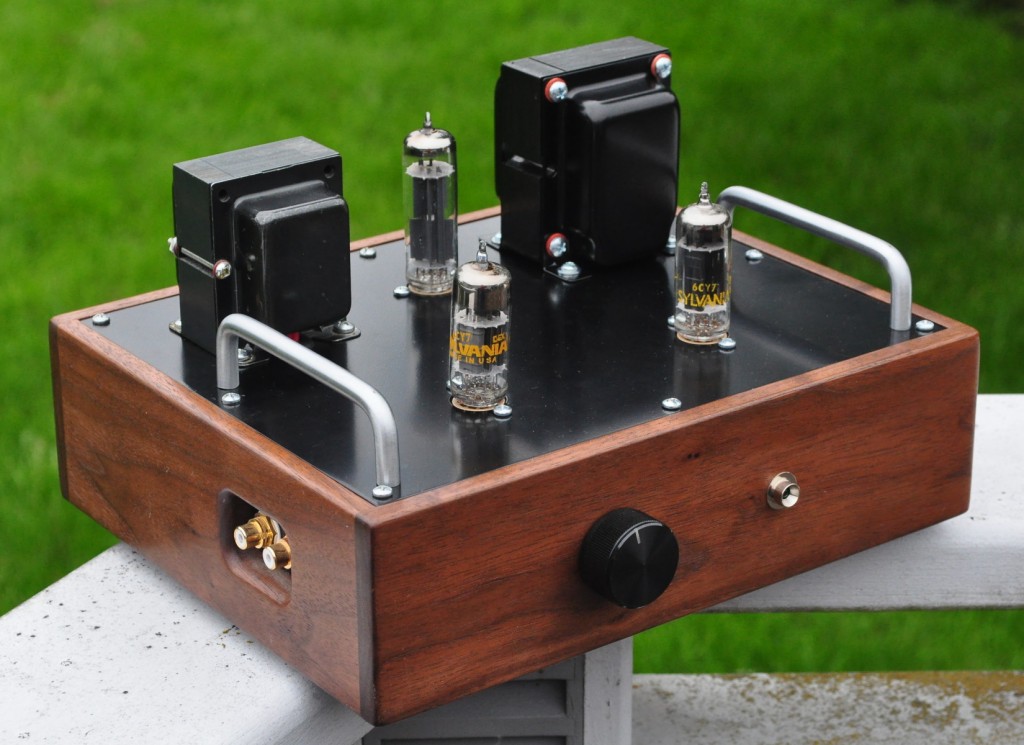
This amplifier came about due to an unexpected turn of events. Those with sharp eyes will recognize that the chassis for this amp is actually from the “Recovery” headphone amplifier. This is what happened. Shortly after I finished the Recovery amp, I started work on my 6V6 Lacewood amplifier. I used the Recovery amp for a while, however when the 6V6 Lacewood amp was completed, it quickly became my default amplifier for most of my music listening. By this time I already had the “Rebuild” headphone amplifier for my desk at work and I had largely stopped listening with headphones at home. This meant that the Recovery amp was put aside.
Then recently I decided I could not simply let this unit sit unused. So I began to look for a suitable project. At first I was thinking some type of preamp until I realized that the power transformer used for the Recovery amp could be reused for a small stereo amp. It is an older Hammond 269EX with a 190-0-190 @ 65mA high voltage winding and a 6.3v @ 2.5A filament winding. As it turned out, this is exactly what was needed to build a circuit using the 6CY7 which I had prototyped a few years before using that very transformer.
The Electrical Design
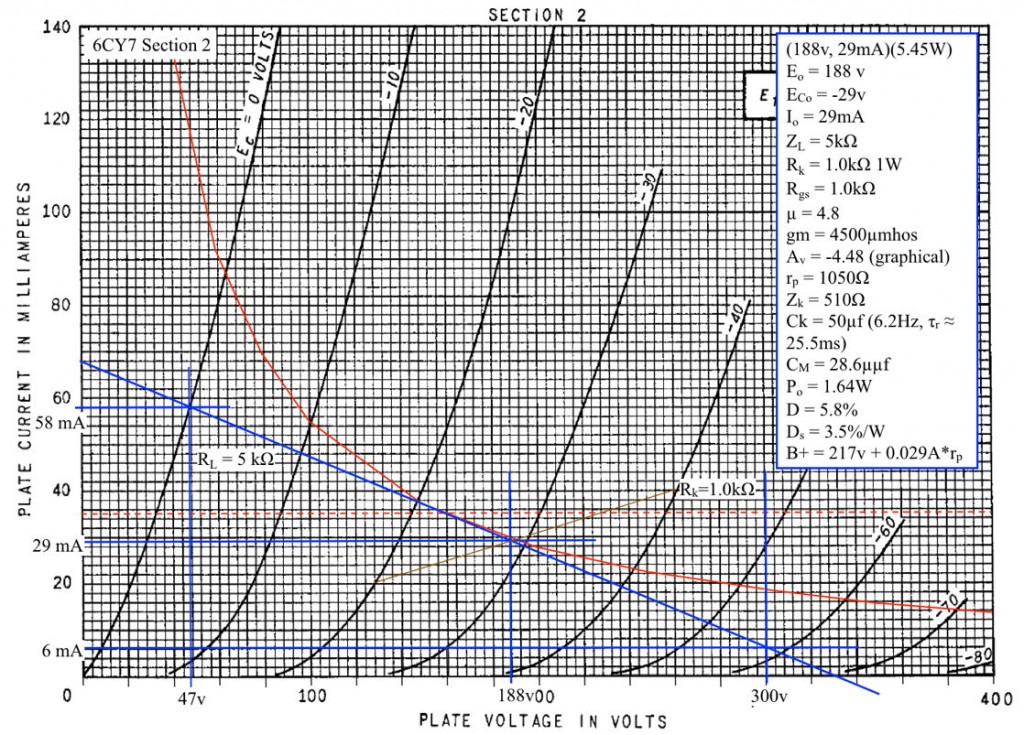
This amplifier is based on another of the vertical deflection dual triodes built for televisions; the 6CY7. This particular tube has a power section with a peak plate dissipation of 5.5 watts. This should translate to a little over one watt per channel. As I said, I had prototyped this amplifier a few years before while exploring alternate tubes. So I went back and revisited the load line designs I had done at that time. Here is the load line for the power section.
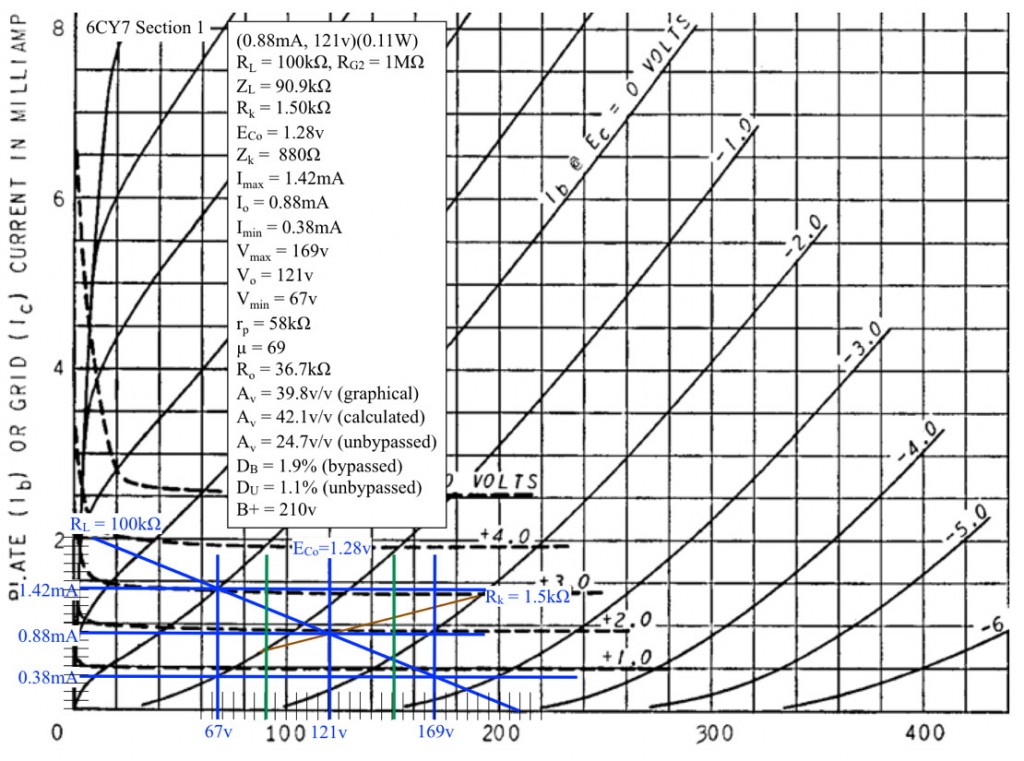
This indicates a peak power into the output transformer of about 1.6 watts. The distortion also looks well controlled. I need about 29v-peak to drive this power stage. From a line level signal, that means that the driver needs a voltage gain of at least 23dBv. Given the nature of the 6CY7 section 1 triode, this should not be a problem. The published amplification factor is 68 so we should be able to get at least 2/3rds of that. The driver stage load line is shown below.
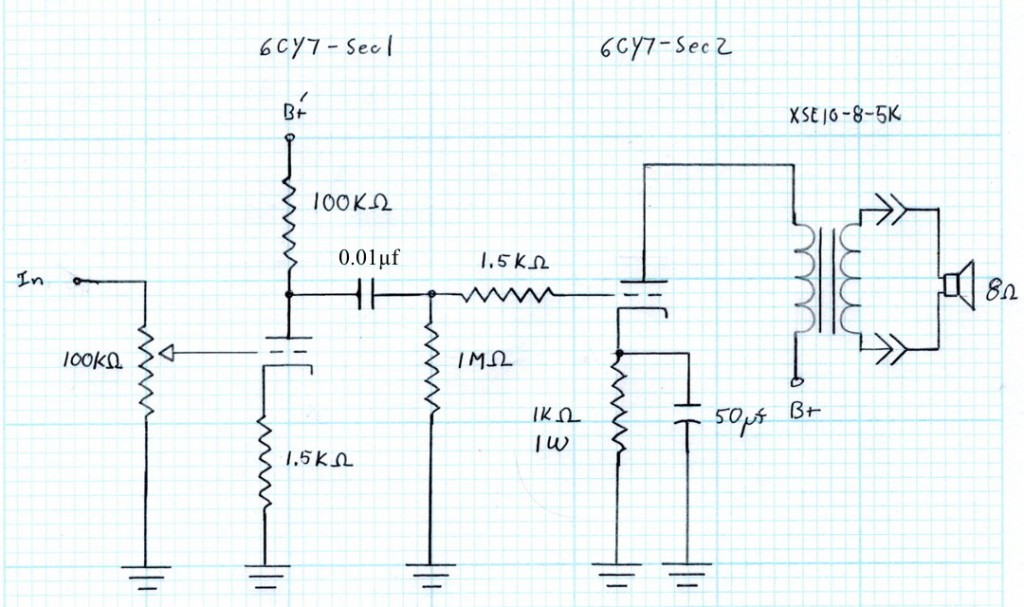
This design shows that this stage will meet both the gain and voltage swing requirements without a problem. The interstage coupling capacitor is calculated as 0.01µf. Here is the final schematic for the amplifier.
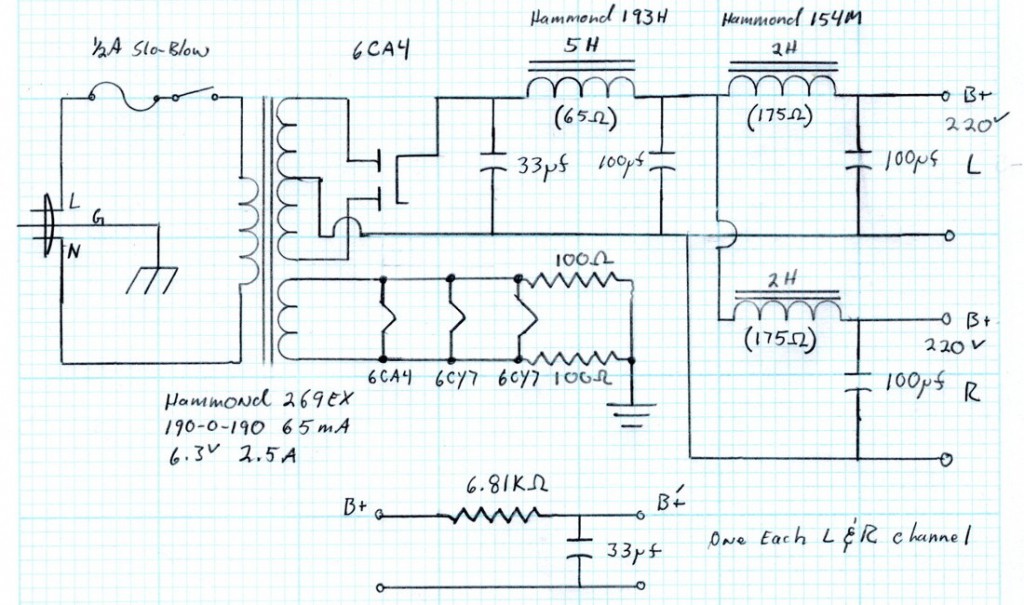
This is a very simple circuit that should be very easy to drive. With the volume control at max, it requires about 1.2v peak (or 0.85v-rms) to drive the amplifier to full power. Most small devices like iPods, phones, and portable CD players will easily drive this amplifier. Here is the power supply design for this amp.
The power supply is a typical split rail design with separate filtering for left and right channels. This helps provide good channel separation and a nice wide sound stage.
The Build
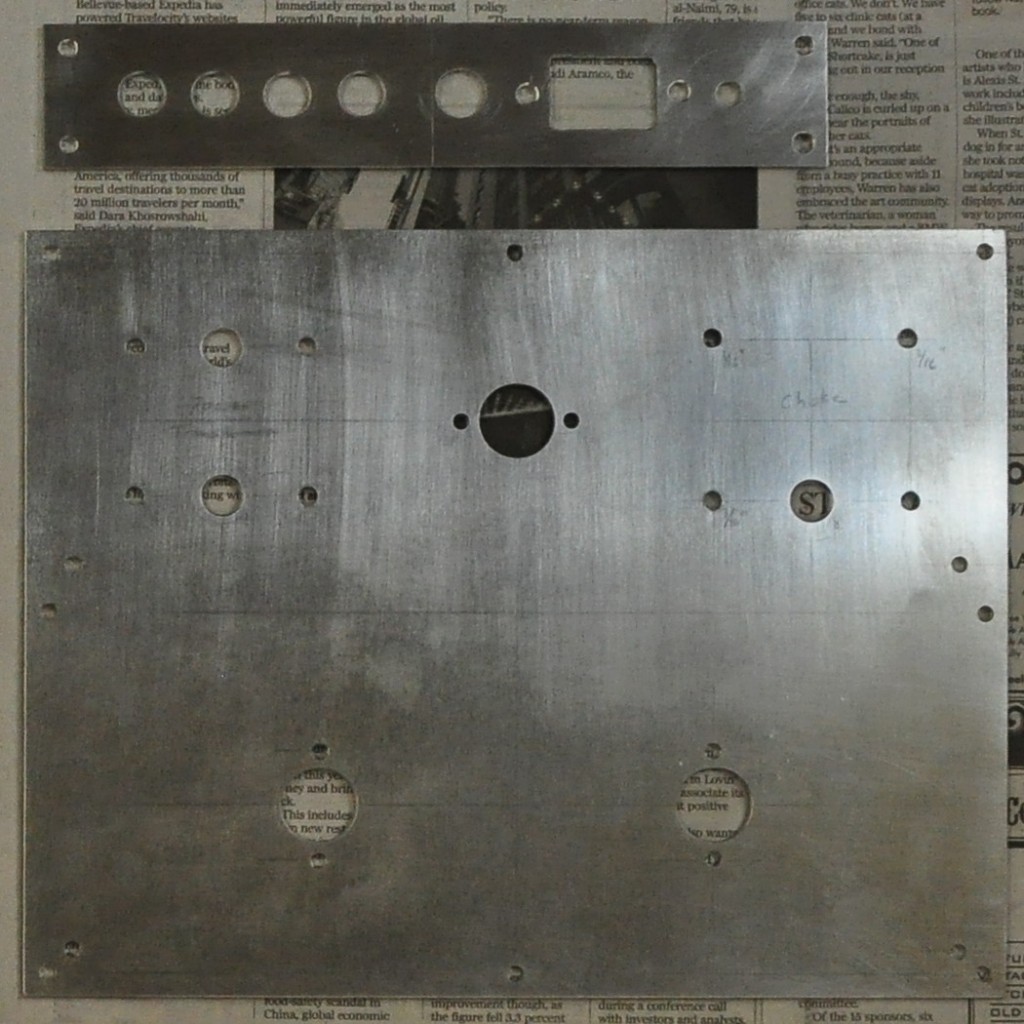
The build for this design needed to proceed along a little bit different lines as the chassis was already built. The new design needed to make use of the current wood chassis layout as this was not going to change. A new top plate was in order because of the different number of tubes, the headphone jack went away and was replaced by a power indicator, and a new rear plate was made to accommodate the speaker binding posts. I also decided that I wanted a nice inductor up top to match the power transformer, so I ordered a Hammond 193H for the primary filter choke. I would be reusing the power transformer, IEC connector, fuse and holder, power switch, tube sockets, input jacks and volume control, 2H filter chokes, and the handles on the top plate.
This level or redesign meant that I only needed two new pieces of metal. These are shown in the picture below, just before painting.
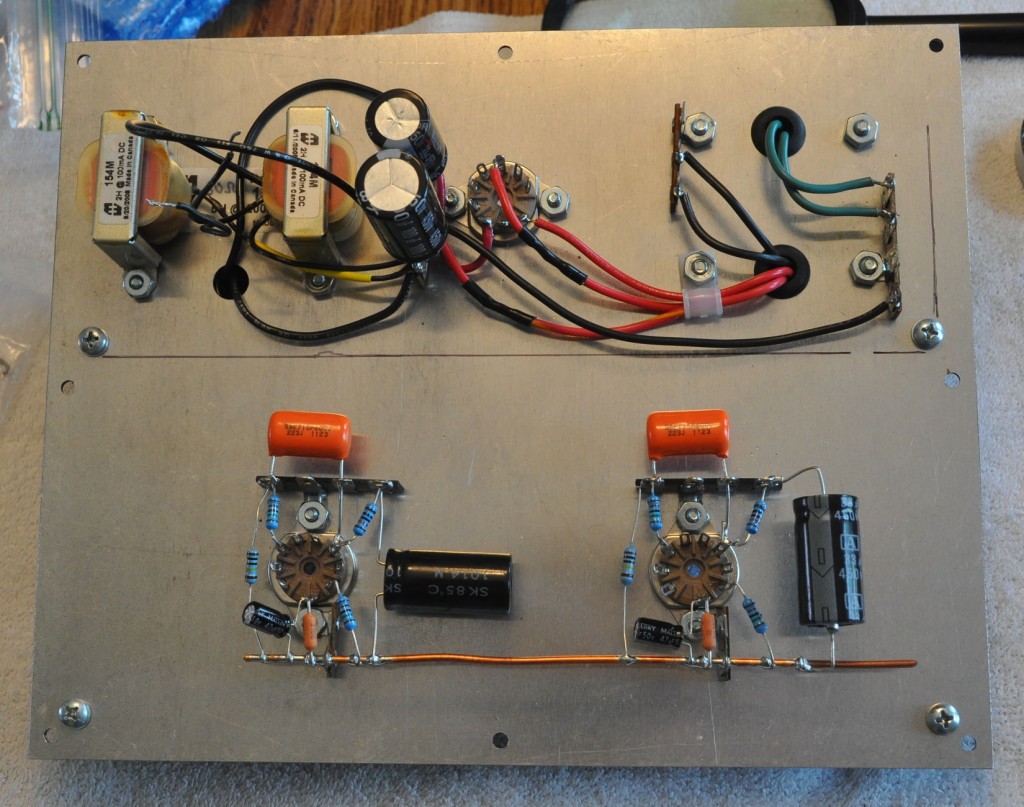
The only real challenge to this design was to decide how to mount the output transformers. I decided to use Edcor open frame XSE100-8-5K transformers and I needed to mount them both inside the chassis. This turned out t be not too difficult. After this decision was made, it was time to start wiring. I decided that I would do as much wiring as possible with the top plate removed from the chassis. This way there is plenty of room to work and seeing things is not a problem. Here is an in progress picture of the top plate wiring.
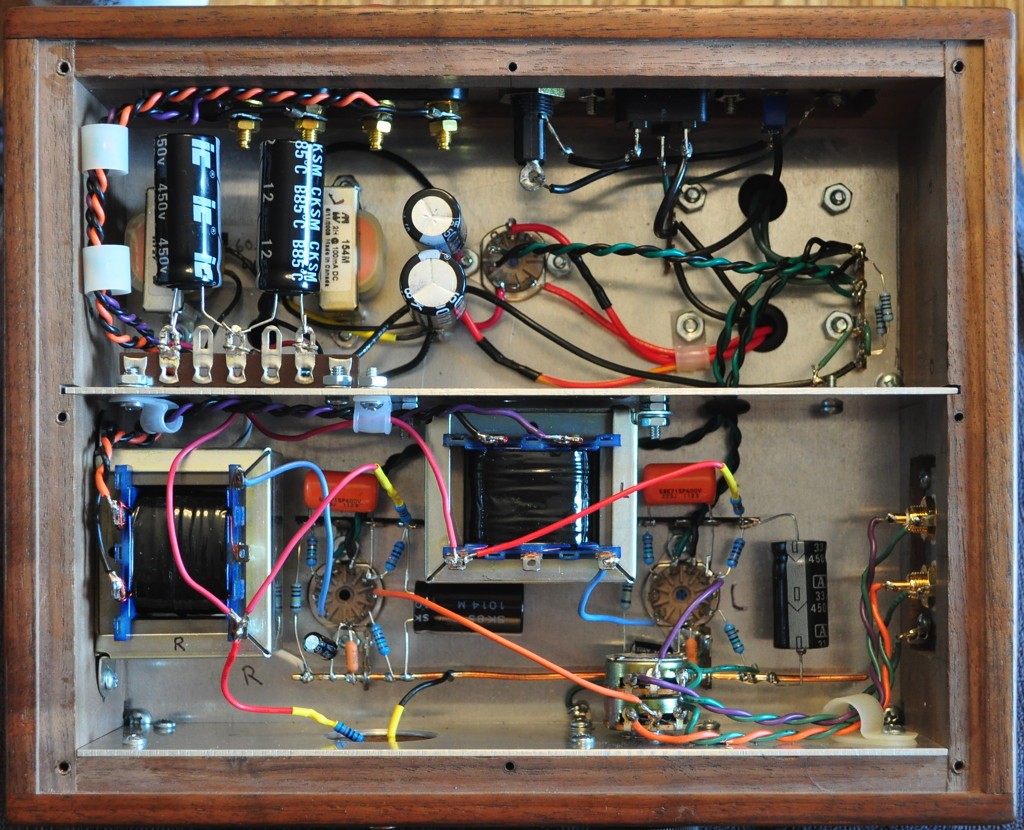
Here the individual components for each channel are mounted to the sockets and the primary portion of the power supply and filter are mostly wired. Wiring in this fashion is significantly easier than doing it with the plate installed on the chassis. Here is an inside shot of the final amp all wired up.
The two filter caps on the upper left are the individual 100µf capacitors for each B+ channel. They are suspended in mid air over (or under) the 2H chokes.
Testing
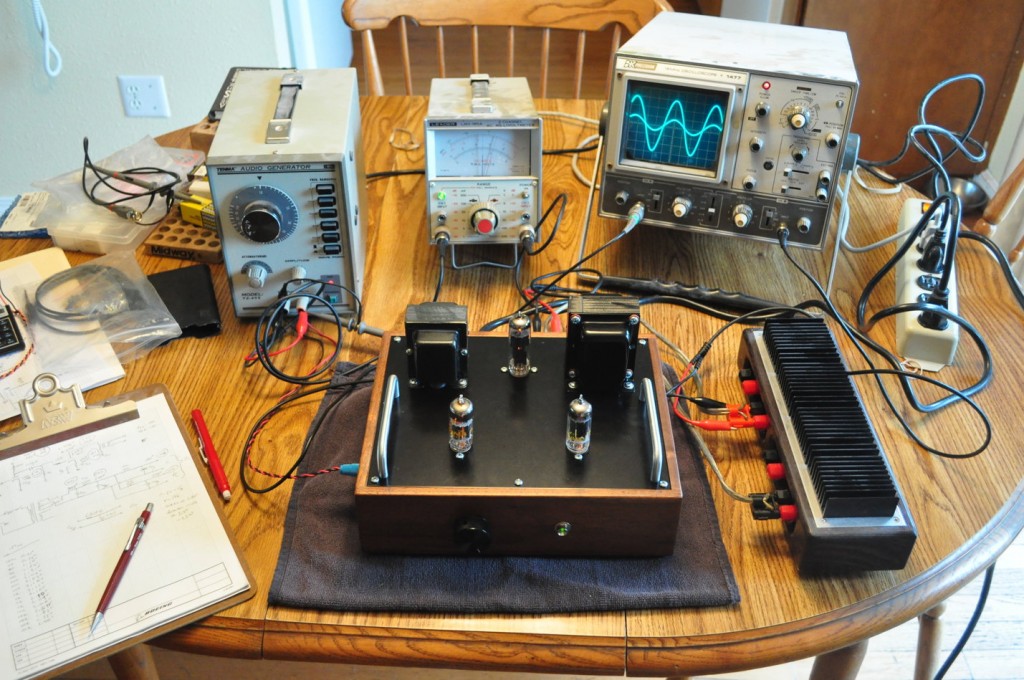
So this amp went through the typical test regiment I give most of my new builds. Here it is all hooked up and in progress. The signal generator is on the left, the dual channel AC voltmeter for checking response is in the middle, and the oscilloscope for checking waveforms is on the right. The unit right to the right of the amp is a dummy speaker load.
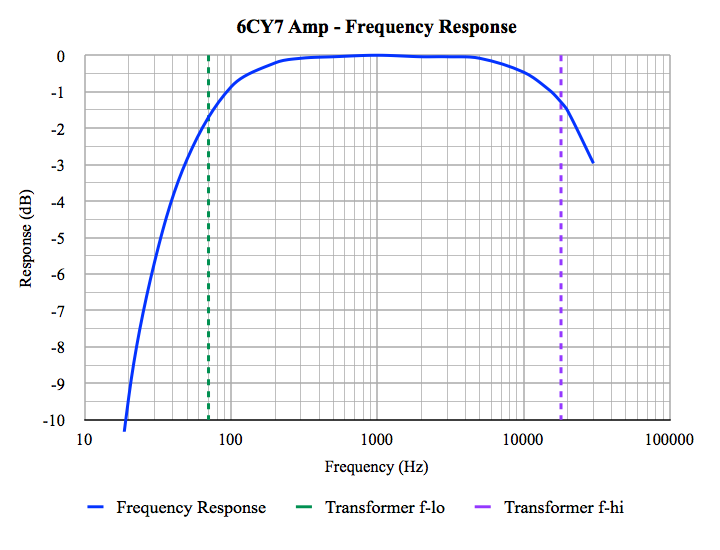
At full output the amp produces a clean 1.3 watts output per channel into 8Ω. The Edcor XSE output transformers are rated from 70Hz to 18kHz. This amplifier did a little better than this having a -3dB bandwidth from about 46Hz to about 30kHz. Here is a plot of the frequency response measured into an 8Ω load.
Impressions
I still can’t get over how good and how loud this amp sounds. It handles everything from classical, to blues, to choral music equally well. And the sound stage is awesome. I will never go back to building common power supply filters for both channels ever again. I’ve had this amp plugged into my system on and off for the last couple of weeks and I am absolutely blown away by the quality of the sound coming from this little unit. I don’t know what it is, but these little triodes are just the best sounding tubes I have ever heard.
This is quickly becoming my favorite amp. I currently have a set of NOS Sylvania tubes in it, but I have also used a set of old used GE tubes which sound just as good. This is really a pretty inexpensive build. I highly recommend that anyone looking for a little iPod or computer amplifier give this one a try. You will NOT be disappointed!
As a follow up: This amp was originally designed in 2011 and whereas it has always sounded excellent, there is a new version available for building. The new design upgrades the output transformers and some circuit values to produce even better results. You can read about the new amplifier at The 6CY7 V2.0 “Zebrawood” Amp. You can build either amp, they both sound excellent, but you should read about them both.

Hi Matt,
I have some questions about this build.
1. Filament connection. Could I tie just one leg of the filaments to ground? Without going thru 2x 100 ohms network resistors? the tubes need 2.5A for filaments and the transformer gives 2.5A exactly. I don’t want to load the 6.3V with more load (extra 30mA)
2. From the pictures it looks like you are using 22nF for the bypass cap. The schematic shows 10nF. is 22nF better?
3. Are you using a ICL? if so, which one?
I understand your concern about the filament load but it’s not really an issue. The extra load is about 1.2% and there is much more margin than that in the Hammond transformer. You can simply ground one side of the filament supply if you want. Or you can increase these resistors to 500Ω and still form the virtual ground using only ≈6mA of current. Either alternate approach will work fine.
You are correct about the coupling capacitors. I originally calculated 0.01µf for the interstage coupling capacitors but decided that they needed to be increased when I did the first build. Yes, 0.022µf is better than the indicated 0.01µf. However, I would really suggest that you use the values from the The 6CY7 V2.0 “Zebrawood” Amp and increase the interstage coupling caps to 0.033µf and the power stage cathode bypass capacitors from 50µf to 100µf. These two changes really fill out the lower register without limiting speed or transparency.
I don’t usually use inrush current limiters (I assume that’s what you meant by ‘ICL’) because they are almost never required. This is a very small power transformer so primary side inrush is not an issue. Just make sure you use a slow blow type fuse. On the secondary side, this design uses vacuum tube rectification so the B+ will come up slowly along with the tubes. As such, the power on transient period is very well controlled.
I hope this answers your questions.
Yes. Thank you for your fast answer.
Dear Matt,
I must say your website and work are an inspiration. Recently I have build the Universal pre-amp. But also read lots of your designs.
For a week ago I sold one of my tube amplifiers and got inspirited at this customer which had a Sylvania tube driven amplifier. It was a Tube with two sections. Strolled off the web and found RCA 6FY7 tube and the seed was planted. Now I am busy to calculate the values and design the power supply.
Somehow I can’t seem to find the right Anode Voltage for low mu section in this tube (6FY7). When I was surfing the web I came across your website and saw you have made several with these kind of tubes.
So the question, if I may of course, RCA claims the best Anode voltage for this tube would be 150V and a current of 35mA. In your design’s I don’t see this.
Although the same specs are for the EM en CY version.
So I am now design the Hight Mu with 275V and the Low Mu section with 167,5V. Or should I just forget about the 150V RCA advices?
Maybe you can answer this question if you have a minute.
Thanks very much sharing your builds in the manner that you do. This way we can learn a lot.
Best regards from Belgium
The thing to remember is that the data points in the data sheets under “Typical Operation” are just that; typical, in their intended usage. When using this tube as a combined audio amplifier, you should be more concerned with the maximums listed on the data sheet.
You need to pick each stage’s operation point based on what you want to achieve. I would start with the power section then see how much you need to get out of the driver. Take a look at the load line designs posted on the 6CY7 Amplifier page. These should help illustrate what I mean.
Also keep in mind that plate voltage is not the same as B+ voltage. The plate voltage is only the voltage between the plate and cathode terminals. Other drops in the plate circuit need to be added to get to the B+ voltage.
Thanks Matt,
For your reply. I do understand what you mean.
In your calculation you have 188V 29mA.
In your power supply circuit you have 220V for the low mu section. But I believe there isn’t a loss of 32V in the OT.
So I was just wondering. For the RCA tube 150V and 35mA would be a nice operation Voltage and current.
I could sent you some pictures of my calculations.
The one thing I don’t understand is 188V on section 2 and the power supply 220V.
Thanks for you reply highly appreciated
In that case I have 150V + 17,5V = 167,5V.
So that should be my B+.
That’s what I have calculated.
And I understand that your 188 + 29V + 5,8V = 222,8V
thanks I am on the right track.
My normal design process is to pick an operating point for the power stage first based on a desired load line. Then I back into the required B+ number. I haven’t looked at the 6FY7 in detail but I would start with a point based on a roughly centered swing about 10% below max plate dissipation.
Pingback: Waiting for Paint | Cascade Tubes
Matt,
For the sake of aesthetics, I love the way Edcor blue transformers and chokes look compared to the black hammonds. I am able to cross the power transformer pretty much spot on. But my question is, what would have to be changed if anything if I substituted the Edcor CXC100-5H-200MA which is 58ohm with the Hammond 193H which is 65ohm?
No. At 60mA, the 7Ω delta is only about 1/2v. Don’t worry about it.
I am going to build this amp again with the GXSE10-5kΩ outputs. I choose the bigger Edcor XPWR257 power transformer (mostly for the 4A filament winding) so I could run a #47 lamp and jewel indicator on the front. I’ll be using a Hammond 156L (5H, 75mA, 135Ω) as the main filter choke and two Hammond 155H (5H, 50mA, 270Ω) chokes for the stage filtering.
In fact, just this morning I was plaining a wide plank of Zebrawood (Microberlinia brazzavillensis) for the somewhat different case. It should look nice.
Matt,
Thanks for the quick response. Zebrawood will look good. Can’t wait to see the your results with the new build. That’s the same power transformer I will be using. As always thanks for the help. I built the marblewood using padauk for the case and all the aluminum a real dark blue with Edcors. Used matched NOS Raytheon 6W6 with great results. Can’t wait to hear this one when I’m done.
Hi Matt,
thank you for sharing this great work. I have a question for you.
I’ve build one of these 6CY7 amps myself with a few modifications (including a solid state power supply to reduce the overall volume). But there is something that is not clear to me. I did my calculation and the gain of the first stage should be somewhere around 40V/V. This pretty much matches with your design. When I measure it with the scope though I get about 25V/V. I’ve been measuring between the grid of the first stage and past the 0.01uF filter cap. I’ve checked the biasing of the amp and all the nodes look ok. Gain of the second stage looks ok as well. I’ve tried two different tubes and got very similar results. Interestingly, in your notes, I see a 24.7V/V “unbypassed” gain. What is that?
You are measuring correctly. The first stage is unbypassed. This means that the cathode is not AC bypassed to ground with a capacitor. I am assuming that you used Av=(-µ*Zl)/(Rp+Zl) to calculate gain. This is for the bypassed case. Without the bypass capacitor, the AC cathode current flows through the bias resistor and this voltage (Iac*Rk) is effectively applied to the control grid as part of Vg-Vk. In this case Av=(-µ*Zl)/(Rp+Zl+(µ+1)*Rk).
If you look at the load line for the driver, in the text box there are three gain numbers.The first two are different methods of arriving at the bypassed (i.e. with the cathode bypass capacitor) gain; the first by picking numbers off the load line plot (i.e. “graphical”), the second by using the first equation in the paragraph above (i.e. “calculated). They are within 0.5dB of each other. The third number is the unbypassed gain calculated with the second equation in the paragraph above.
In this design, I decided to not bypass the driver stage cathode specifically to reduce the gain. With a power stage biased at 29v, the driver will fully drive the amplifier with an input of 830mV (i.e. ≈1.2V peak). I thought this was a much better design point than the higher gain one with the cathode bypassed.
Does this clear things up?
Thank you Matt.
This is very clear.
I’ve added a cap to the cathode and the gain is now what I expected. I plan to build some other projects based on your designs in future. I think I’ll come back with more questions.
Antonio
Pingback: 6CY7 DUAL TRIODE VALVE AMPLIFIER - ATMega32 AVR
Hi Matt,
I’m thinking of building one of these – it looks like a great first audio amp project (I’ve built a bunch of guitar amps previously). I’d like to build a matching preamp for a turntable – any suggestions? And/or is it possible to incorporate a pre section into this build?
Thanks for a very inspiring website.
There are many options for turntable RIAA preamps. However, all share a requirement for very quiet power supplies and very low stray fields due to their very high amplification factor. As such I would not recommend adding an RIAA preamp to the same chassis as this amplifier. I always build RIAA preamps in separate chassis.
As for which one to build, that’s a big question. If you have never built one before I highly recommend the kit from BoozHound labs. This is a great starter kit, is not too expensive, and is something you can run off batteries or a small quiet power supply. Here is a writeup on this particular unit.
Once you have the unit up and running you can decide if you want to go for a more complex build like this one.
I hope this helps.
Can’t track down any Hammond 154H Chokes. Can 154M or 157R be substituted in the 6CY7 Stereo build?
Ok. The two filter chokes specified are Hammond 154M chokes (2H, 100mA, 175Ω). The 157R (2H, 200mA, 57Ω) will work equally well as would the 154M (4H, 50mA, 300Ω). If you are having difficulty finding the Hammond chokes I would also recommend the Triad C-24X (1H, 240mA, 50Ω) in this location. Mouser has both the Hammond 154M and the Triad C-24X available on their website.
When making adjustments that may raise the total B+, just sure that the you don’t exceed the 5.5W maximum plate dissipation in the power section (Section 2) of the tube.
Thanx Matt. Must have picked up the “H” off the 193. Getting old and eyesight not like it used to be. Q1) can I run mult-Ω OT’s instead of 154M’s to select for various speaker impedences? Q2) want to add a Dual Gang, Switched Pot for volume control. Any recommendations? Trying to keep it very clean by not having a separate power switch.
You can definitely use multiple taped output transformers. However, this has nothing to do with the 154M filter chokes in the power supply.
..
The Edcor output transformers are mostly single output. However, they can custom wind you a transformer with multiple taps for a fee. I have no idea how much but probably substantial. The Hammond 125BSE and 125CSE are also options for multiple outputs. This will give you a 4Ω, 8Ω, and 16Ω tap for the 5KΩ primary value. These are available from various suppliers like Mouser or Allied Electronics.
As for volume pots, my favorites are the military grade pots from PEC. But I don’t think they have any with a switch. My guess is that it’s going to be difficult to find a dual pot, audio taper, in the right value, with a switch.
I will also caution you that by putting the power switch on the back of the volume control, you’re bringing relatively high voltage AC into close proximity with your signal lines coming into the amp. In general this is a recipe for hum. It is normally something against which I advise.
I hope this helps.
Thanx again Matt. As soon as I pressed “Submit” I knew it was the Edcor’s not the 154M’s. I was planning on shielding the a/c to the pot switch but that may not be enough. If hum is too much I will add switch.
Hi Matt. Thinking about building the 6cy7 amp. I have a pair of BEZ output transformers and a case, I also possess an tube SMPS putting out 250volts and 6.3volts. Question. Will the 6cy7 work with 250volts? If not how easy will it be to knock an SMPS down to 220v.Not sure whether simple resistors will do. Regards Robin Telford
Actually having +250v at the SMPS is a good thing because it will require some filtering. I strongly recommend at least one LC filter stage and then use an RC filter stage for each output stage. Simply select a power resistor of the appropriate value to get you down to around 220V at load.
Hi Matt. Thanks for the quick reply. Looking at the SMPS it looks like it’s got plenty of capacitance but no inductor. Space is a bit tight so I’m going to use a Hammond 154b inductor .
3h,150ma,negligible resistance. I’ll put a 25uf film cap across the first stage as suggested. That should do the trick, along with the series resistance of course. Regards Robin.
Buenas tardes y Felicidades por el nuevo Año 2020.
He leído este proyecto y me anima a construirlo.
Creo que es un buen trabajo.
Mi mayor problema es encontrar la válvula 6CY7 .
Alguien me puede indicar un proveedor, gracias.
Resido en España Madrid.
Un saludo
> Good afternoon and congratulations on the new Year 2020.
>
> I have read this project and it encourages me to build it.
> I think it’s a good job.
> My biggest problem is finding the 6CY7 valve.
> Can someone tell me a provider, thanks.
>
> I reside in Spain Madrid.
>
> Greetings
Ricardo; Generally I find that http://www.ebay.com has a ready supply of 6CY7 tubes. I also sometimes use http://www.thetubestore.com. I hope this helps.
Pingback: This Beautiful Tube Headphone Amplifier Was Built From Scratch | iotosphere - Internet of Things
Hello,
I’m planning to build your 6CY7 amplifier, I would like to use it with Electrovoice 12TRXB speakers I have had for many years. They are fairly sensitive, around 92 SPL, however they are also 16 Ohm speakers. I called Edcor and a very pleasant man suggested I might substitute their GSXE10-5K 16 Ohm output transformers for the XSE-8-5K output transforners you recommend. I thought I should check before altering your design.
I have enjoyed reading your description of this project, as well as the DIY Audio thread. Both are very nicely done.
Thank you in advance for your response. tna
Yes the folks at Edcor are very helpful. I would recommend one of two substitutions. One is the GXSE10-5K in 16Ω secondary recommended by Edcor. The other is the Edcor XSE15-5K. The latter is an open frame XSE series that is only slightly larger than the specified transformer. This will yield improved performance at the low end due to the larger primary inductance. The GXSE will yield better performance still, but it will cost you about $14 more for the pair of transformers.
Really, the choice is yours but either will perform well. When you order, just be sure to specify that you want the 16Ω secondary impedance.
Hi Matt. I am about to build this amp but have to use the Hammond 369ex transformer. I am new to amp building and was wondering about the center tap on the 6.3v secondary. Should I ignore this or connect it to ground or one of the cathodes and remove the 100ohm resistors.
Thanks for all your work
Steven
Just omit the two 100Ω resistors on the filament lines and tie the center tap from the 6.3v winding directly to signal ground.
The two 100Ω resistors form a virtual ground for the filament circuit if the transformer does not have a center tapped filament winding. I actually prefer using center tapped filament windings if they are available.
Matt,
I notice you don’t use negative feedback on your amps. Please explain your reasoning on this.
Thanks, Gary
For a quick summary on my position on feedback, I suggest you read my blog post from this last March found here: A Note On Feedback
Thanks. Very interesting blog. I always wondered why feedback would really be that necessary with these SE amps with just two stages! But I can see how, as far as the perceived way that sound is heard, is very subjective and each person is different. Enjoy your write ups on each project…and how thorough you are with each one…also the very neat wiring and look of the finished project.
Hi Matt, I’m a little confused your load line for section 2: The schematics indicate a B+ volts, but the load line shows a B+ of about 325 volts @ zero plate current and at zero plate voltage the plate current is 68mA which gives a B+ of 340 volts for a 5K load. Can you explain these discrepancies to me?
You are confusing the power stage load line with a restively loaded stage. The load line you are looking at in the power stage diagram is the AC load line. The DC load line is on the order of 200Ω. The static bias point is determined by the DC load, not the AC load.
A value of 200Ω is essentially straight up and down at this scale. For this much difference between AC and DC load values (i.e. 25:1) you can safely ignore the DC resistance and put the bias point at the B+ value. You’ll notice that in the table embedded in the graph, the power stage bias point is at 188v/29mA.
The required B+ is derived as 188V (i.e. the quiescent plate voltage) plus the cathode bias voltage (i.e. 29V) plus the dc drop in the output transformer primary. This is shown in the bottom line in the embedded table in the figure. The actual total is 188v+29v+5.8v=222.8v. Given the accuracy with which lines can be drawn and the fact that the plate characteristics are average values over a family of samples, I simply rounded to a B+ of 220V for the power stage. The error in doing this is only (2.8v/222.8v)*100% ≈ 1%.
This process yields a nice round number for the B+ that doesn’t cause people to fret too much over the accuracy of the B+ voltage in their builds. If I had indicted a B+ voltage of 222.8v, some people would have fretted over a B+ voltage just a few volts higher or lower. The nice round value has the psychological benefit of putting people’s minds at ease.
I hope this helps.
Matt,
Thanks for the quick reply and yes it helps greatly; I concluded the same thing myself after thinking about it. All the references I have only mention resistively loaded valves so thats why I got confused. Another point of confusion is that in the embedded table you indicate B+ = 217V + 0.029A * rp but you left out rp in your calculation above which would add another 30.5 volts? Also you mention that it would take about 29 volts peak to drive the output to full power, how do you determine that? I’m thinking of building a similar amp with the 6DR7 as a design/learning experience so I’ve studdied your design extensively but I’m fairly new valve amps but I have built both your Lacewood V2 and the your 4S preamp an I like them a lot especially together.
First, 0.029A x 200Ω ≈ 5.8v. I’m not sure where you got 30.5v. You’ll have to explain your calculation. You’re correct that I did leave the output transformer primary DC resistance off the load line design. That’s because the design came first and I had not as yet chosen the exact output transformer. Once I did, I designed the power supply for the correct voltage.
The maximum power stage AC drive signal is based on the bias voltage. This design is DC biased to 29V. If you apply an AC voltage to the grid with a peak value of 29v ( ≈ 20.5v RMS) then the grid will swing up to zero volts and down to -58v on each cycle. If the AC signal is any bigger, the grid will go positive and start to draw current, inducing lots of harmonic distortion. So max power is at full grid swing with the 29v peak sine wave.
I’m glad you like the other projects. I try to present designs that are easy to build and yield nice results. I think both the Lacewood and the 4S meet those guid lines.
Matt, I thought rp referred to the plate resistance for the valve which is 1050 ohms listed in the embedded table. Thanks for the explaination on the required drive, simple and makes perfect sense. I appreciate all your help help and wonderful contributions to DIY valve audio.
Hello,
very interesting projects and website.
I need the simplest hi-fi amp I can build: One stereo input, one stereo output (speakers: 8 ohm, 75W), volume control. For listening to music in my room, from my computer…
Does this project will do the job? Is it a good start for someone who never have built an amp? I have built many electronic projects and repair an handful of guitar amp (solid state and tubes based) …
Thanks!
This amp’s output power is about 1.3W per channel. This is a great sounding amp but it needs to be matched to appropriate speakers. Do you know what is your speaker sensitivity?
Personal experience – one watt per channel into standard 86 dB speakers will easily fill a 20ft X 20ft living room with pleasantly loud sound. Average power level runs about 200 mW per channel for this listening level.
It takes a lot less amplifier power than most people think to get good and loud.
I built this amp with a solid state, RC filtered power supply. I have an output switch for speakers, or headphones through a resistor network for load matching and attenuation. This is my second tube amp build and it was on a tight budget. Sounds very good, lots of clarity and texture, as long as you respect the low power output. I am still chasing down a very quiet, but audible 60 Hz hum, but quite pleased with the project. Thanks for the design!
I’m trying to understand what the 6.81K ohm and 33u Farad filter part on the power supply does. Doesn’t that drop the B+ voltage significantly below the 210V B+ denoted in the graph of section one of the 6cy7?
Thanks
Actually this is an additional filter stage between the signal and power stages of each channel. This provides additional power supply ripple reduction for the high gain stage and helps prevent regenerative action between the stages; a characteristic necessary for the accurate reproduction of certain types of harmonic rich content. The filter stage provides approximately 44dB of isolation at the primary ripple frequency and considerably more at higher frequencies.
As for the voltage drop, the driver stage only draws about 0.9mA so the total voltage drop due to the filter stage is only about 6.1v. This stage operates perfectly acceptable with this small reduction in B+.
Does this answer your question?
It does! thanks a bunch!
How much is the approximate cost of this amp if buying all parts?
I have a parts list but I haven’t priced it out. The big items are the chassis, transformers and chokes, and tubes. But the piece parts can add up if you’re not careful. Let me see if I can generate an estimate.
Hello
Thank you for all the work – the amp looks impressive – greatly appreciate your effort.
I have a quick question, i am using B&W P7 Headphones and their impedance is 22ohms – a bit higher that the 8ohm this circuit is designed for. Would this still work for my headphones, and if not – what should be changed.
Best regards.
You might be able to get by using the Edcor XSE10-16-5K output transformers. It’s still not a great match but some have reported that there is some wiggle room in this amp with respect to output loading. Kenny says he is running this amp with 4Ω speakers on the 8Ω outputs and he likes the sound. So 22Ω on 16Ω output transformers may be ok.
I just finished building this amp and I am very happy with it. It outputs into a pair of ESS PS820 bookshelf speakers with good volume. Speaker impedance is 4 ohms but my ear can’t detect any distortion.
I am a “digital guy” but this amp has won me over to the dark side (analog) and I loving it. Thanks for the great design.
I’m glad the amp is working well for you. There are XSE10-4-5K available if you want to get a better match to your speakers. Enjoy.
Hello, iam Santi from argentina. i m really interested in this project, i was looking to make an amp with tubes and this one seems to be a simple but awesom option.
in argentina the line V is 220v 50 hz, how this affect on the power supply.?
Do you have a BOM to make it a little more easy the parts search ?
Cheers Santi
If you are running off of 220 volt mains you will need to order the Hammond 369EX power transformer instead of the 269EX.