Something A Little Different
I have never been fully satisfied with the designs of most vacuum tube headphone amplifiers. The reason for this is because so many of the typical designs have some serious shortcomings.
The typical cathode follower designs tend to be high distortion and sensitive to headphone impedance. The more exotic types, including the White cathode follower and the popular but misnamed SRPP, tend to be highly sensitive to component and tube variation. And both types of designs require large output capacitors that distort the sound and suffer high leakage currents; resulting in DC offsets which stress, and can even destroy, headphones. Most designs that use output transformers tend to be noisy and are required to be closely matched to the intended headphones. Hence, these designs tend to be only medium fidelity and lack versatility.
So imagine my surprise when I discovered a design that does not suffer any of these shortcomings. This is a transformer coupled design that is high fidelity, low,noise, works well with a wide range of headphone impedances. The minute I examined the schematic and realized its secret, I knew I had to build it!
The Electrical Design
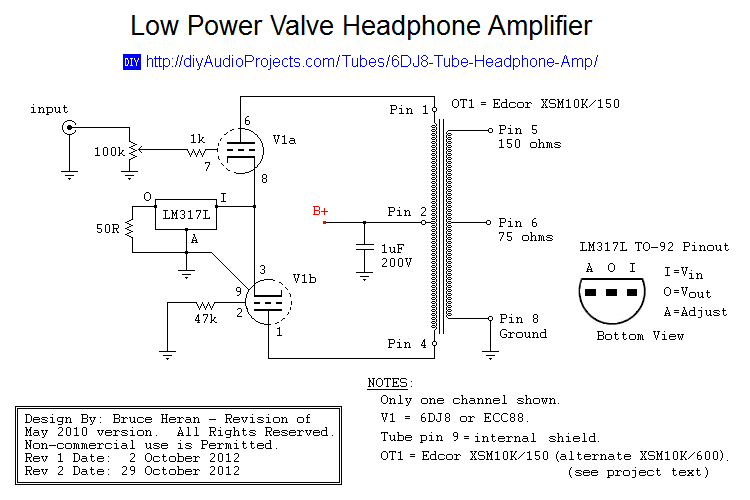
The design for this particular amplifier comes from Bruce Heran over at OddWatt audio. This is a design that Bruce shared on the DIYAudioProjects website back in 2012. At the time I didn’t fully appreciate the unique feature of this amplifier. If I had realized how this circuit really operates when I first saw it, I would have built it far sooner. As it is, it took me several years to finally complete my build. Here is the deceptively simple schematic Bruce shared on the project page.
This design uses one 6DJ8 dual triode for each channel. The triode is wired in a push-pull configuration with a small line matching transformer. In the common (between the triodes) cathode circuit is a solid state three terminal voltage regulator wired as a constant current source. And that’s all there is to it. Add a few resistors, a couple of decoupling caps, and a volume control and the amp is complete.
Now this begs the question as to how so simple an amplifier can be as good as it is. And this is where the “not so” secret feature of this architecture comes into play. Those with sharp eyes will recognize this as nothing more than a simple, symmetrically loaded, differential pair with a current sink in the common tail. This is actually the exact same architecture used in the input section of virtually every solid state operational amplifier made today.
Those who have designed differential pair circuits with current sinks in the tail, whether with transistors or tubes, will know that this circuit has some very nice characteristics. It is inherently low noise with high common mode ripple rejection. It is very well behaved so long as the load is balanced, which this one is by definition. And here is the most important feature, it is inherently insensitive to load impedance variation. So this simple circuit fixes all the problems with those other headphone amplifier architectures. It is low noise and well behaved and hence high fidelity. It is well behaved electrically hence it is not sensitive to variation in tube parameters. And it is insensitive to load variation, so long as load symmetry is maintained, and hence it works well with a wide range of headphone impedances. This circuit is not simple, it’s elegant!
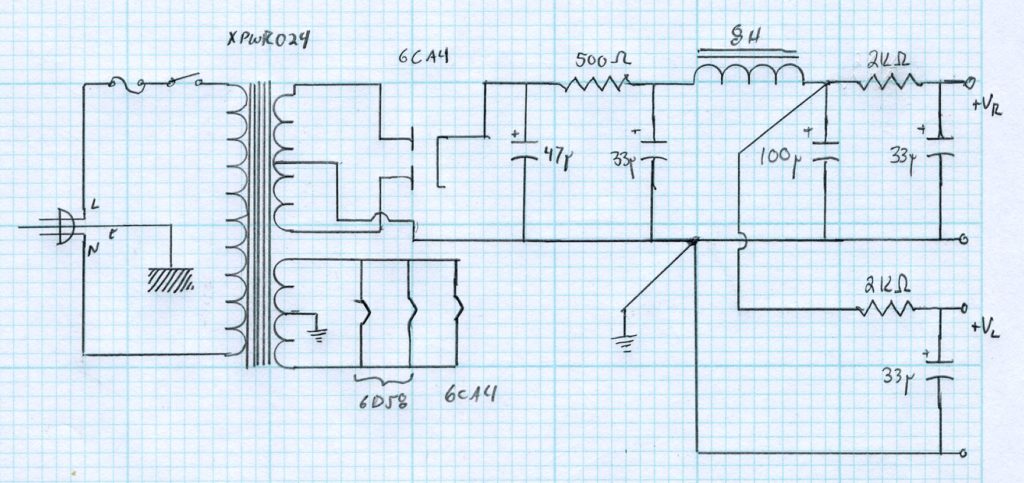
So I decided that I would build this amp and put my own twist on it. I decided to use vacuum tube rectification but I wanted to keep the cost down. So I chose an open frame power transformer from Edcor that perfectly fit the bill; the XPWR024. It has a 350vct (175-0-175) @ 60mA coil and a 6.3vct (3.15-0-3.15) @ 2A coil. Each amp channel draws 25mA and the total filament draw is 1.6A leaving some margin for an indicator light. Here is the schematic for my power supply.
The amp circuit only needs between 130v and 150v B+, so there’s a fair amount of dropping resistance to get the output voltage into an acceptable range. Bruce provided his own power supply design on the DIYAudioProjects project page for those looking for a solid-state solution.
The Build
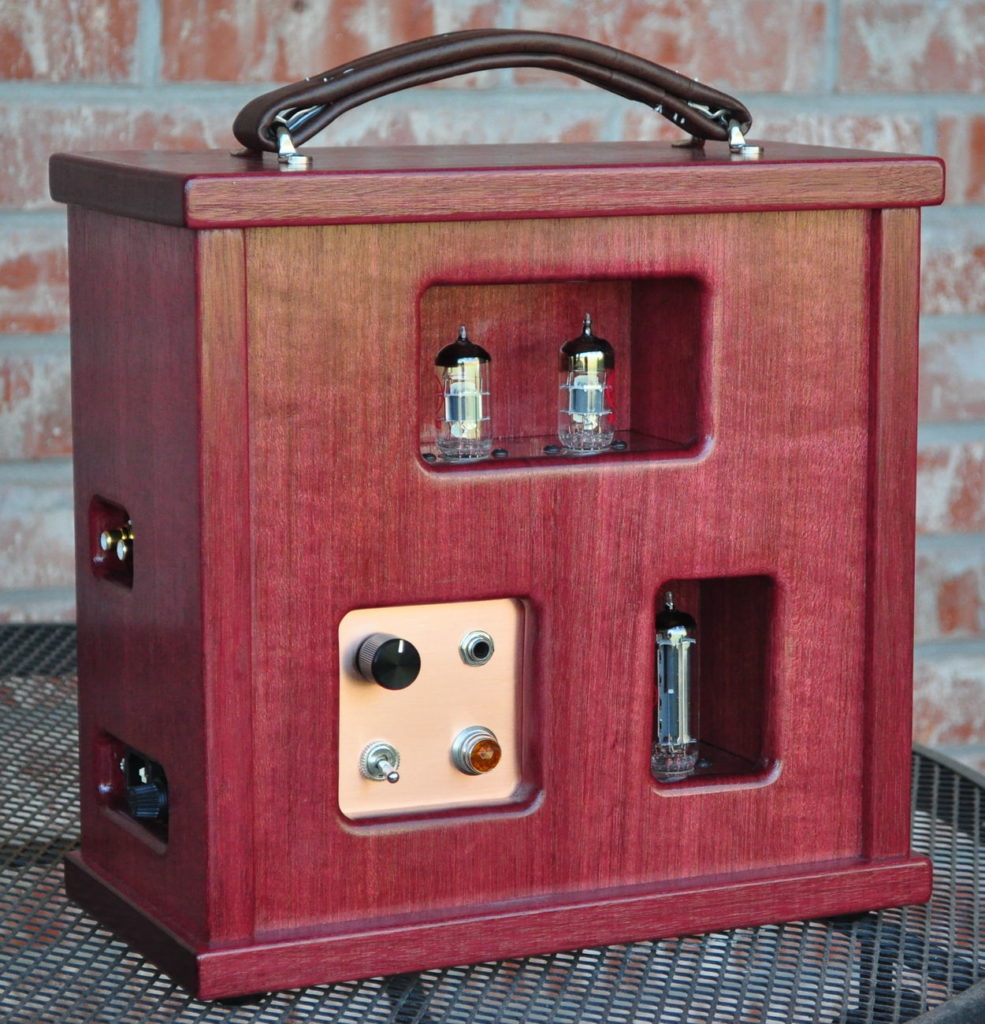
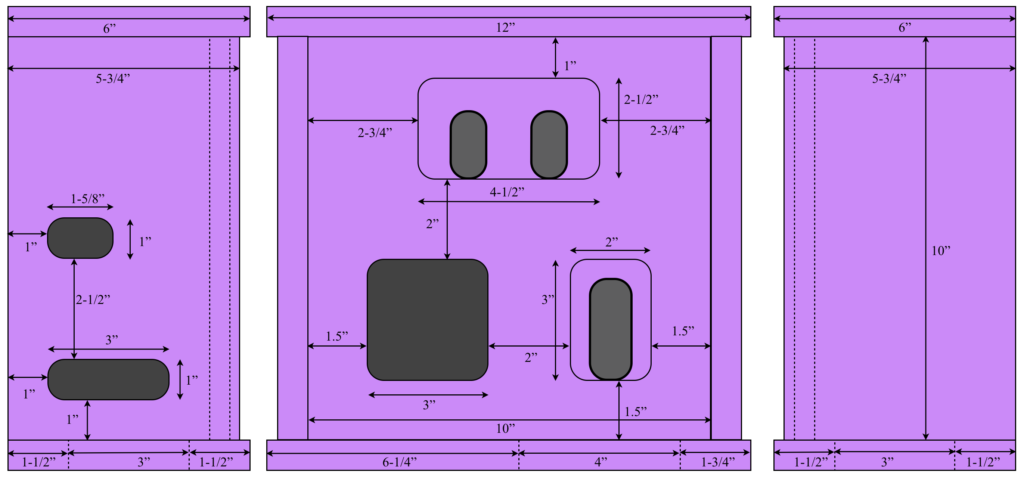
The build for this amp needed to have a relatively small footprint so that I can use it on my desk at work. So I decided that I would mimic the very successful 6EM7 vertical map build. The total footprint on this amp is only 12 inches wide and 6 inches deep. The exposed front panel is 10 inches by 10 inches. This is a very nice size overall. Here are the complete chassis dimensions.
I decided to try something a little different in my material choice. The amp is made of a single plank of purpleheart (Peltogyne spp.) that had been sitting in my lumber rack for over 20 years. The wood was all planed, cut, and sized at the same time to ensure perfect color match. When the amp chassis was assembled, it got five coats of rubbed oil giving it a deep sheen. For the metal, instead of going with something like painted aluminum, I decided to go with buffed copper plate clear coated for all the exposed metal plates. This combination, oiled purpleheart and buffed copper, yielded a striking result that I really like.
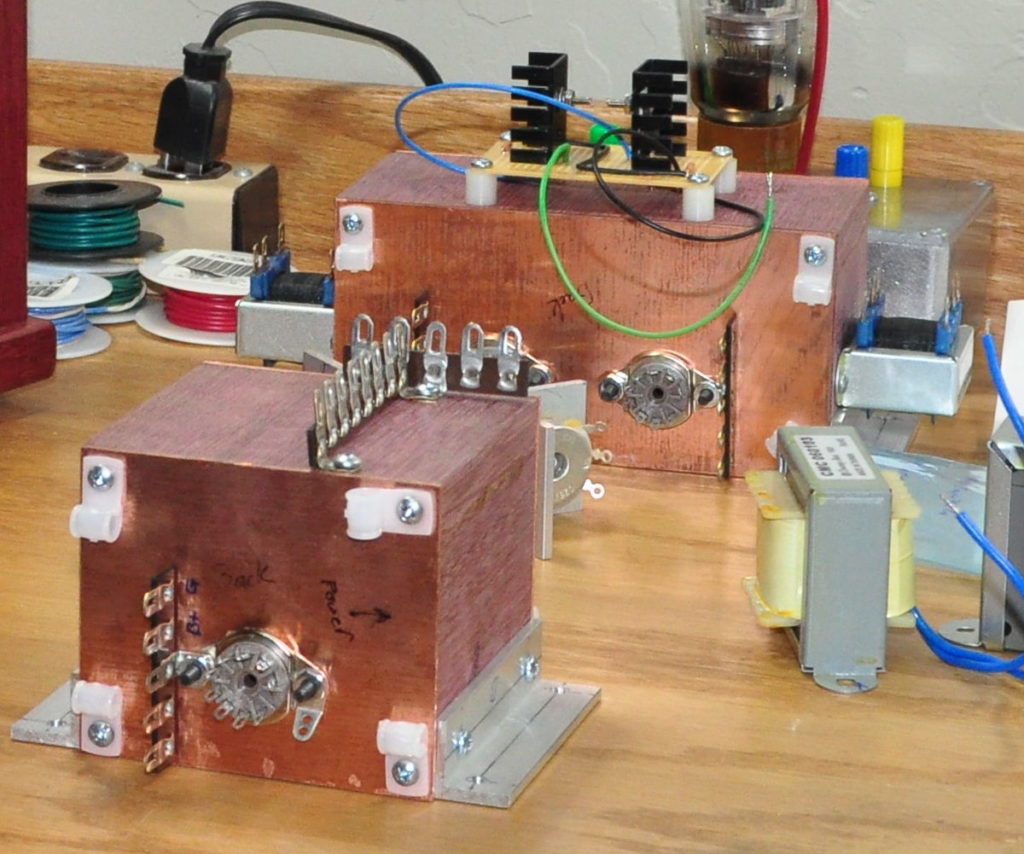
As with the 6EM7 amp, the tubes all fit in cubby holes made of purpleheart with copper plates above and below. These can then be prewired prior to installation into the chassis. Here they are before I started wiring.
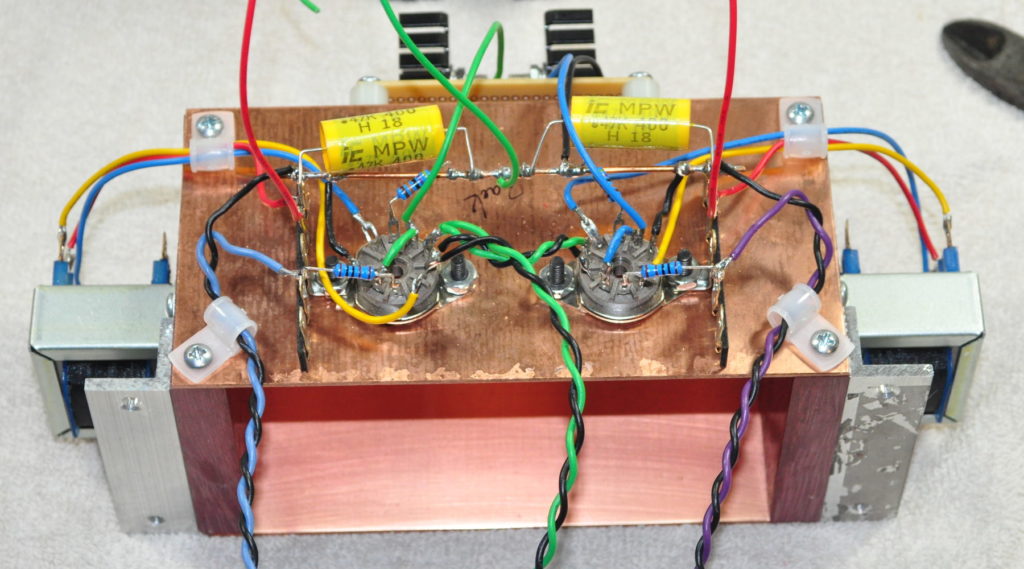
The small circuit board containing the two LM317T regulators can be seen mounted on the bak of the signal amplifier assembly. I like to do most of the work on these before they are installed in the chassis. Here is the amplifier module all wired and ready for installation.
In this picture you really get a feeling for how simple this circuit is to construct. Each channel has only two resistors and one capacitor for discrete components. The red leads are the B+ for each channel and the green lead is the signal ground. The twists at the bottom are the input signals for each channel (blue/black and purple/black) and the filament feed (green/black) for the two tubes. This amplifier module is completely wired and ready for installation into the chassis.
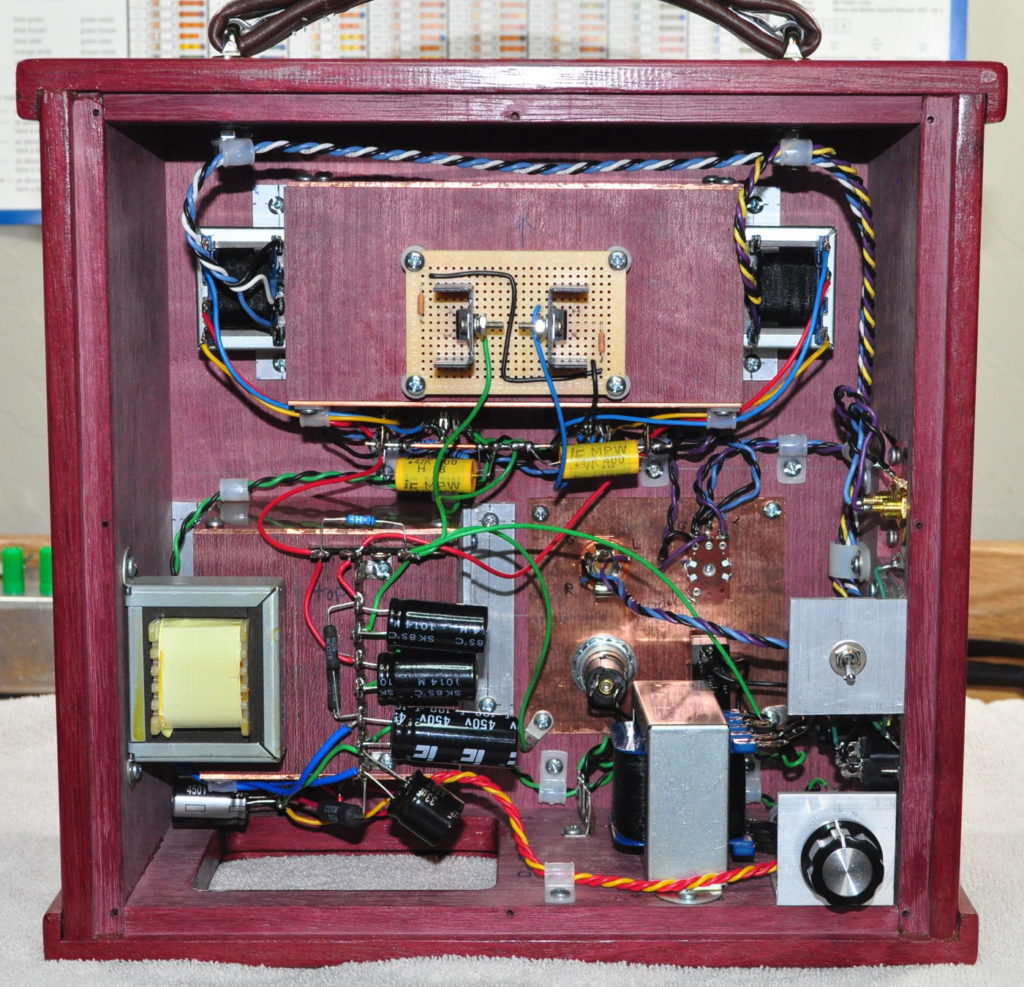
The chassis was sized so that everything sits neatly inside. Here is a view from the back with the rear cover removed.
Here the main power transformer are to the lower right and the power supply rectifier and filter circuitry are on the lower left. The amplifier section is all wired in on top. You’ll notice that I have all three leads off the transformer secondaries wired into the chassis. This is for the small switch on the right. This is a DPDT switch to use either the high or low impedance taps off the transformer.
I should note that there is a slight error on the schematic. The output tap labeled 75Ω should really be labeled 37.5Ω as this is half the number of turns as the total and hence one quarter the impedance. However, the design is so insensitive to load impedance that treating these two positions as just “Low” and “High” is acceptable. Headphones lower than about 100Ω should use the “Low” setting and headphone higher than 100Ω should use the “High” setting. Edcor also has a 10kΩ:600Ω matching transformer that would present 150Ω and 600Ω outputs hor those using higher impedance headphones.
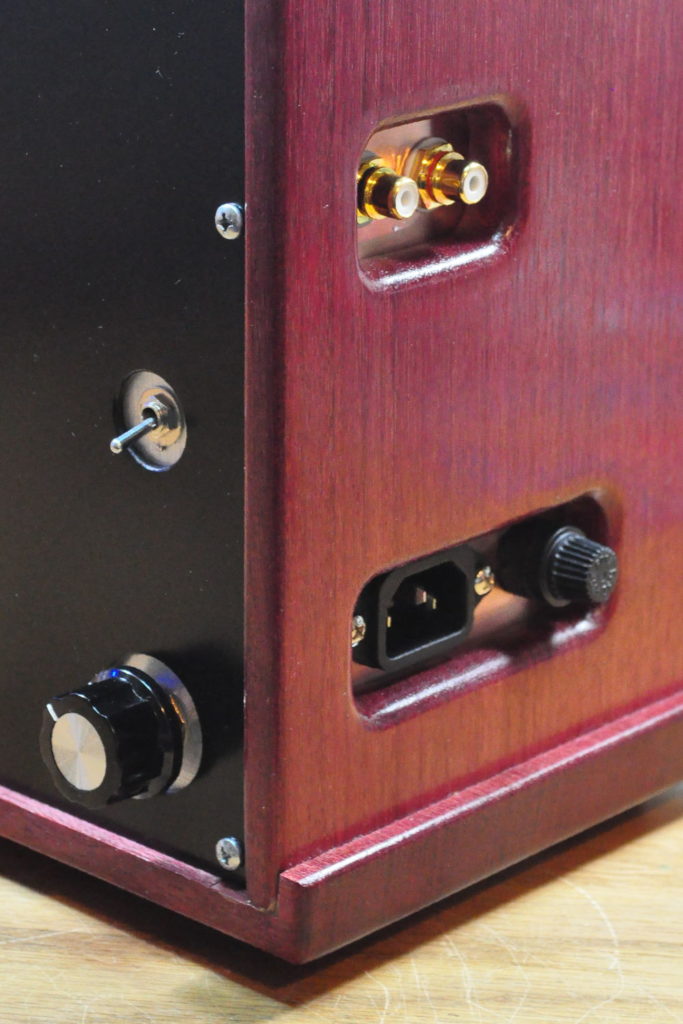
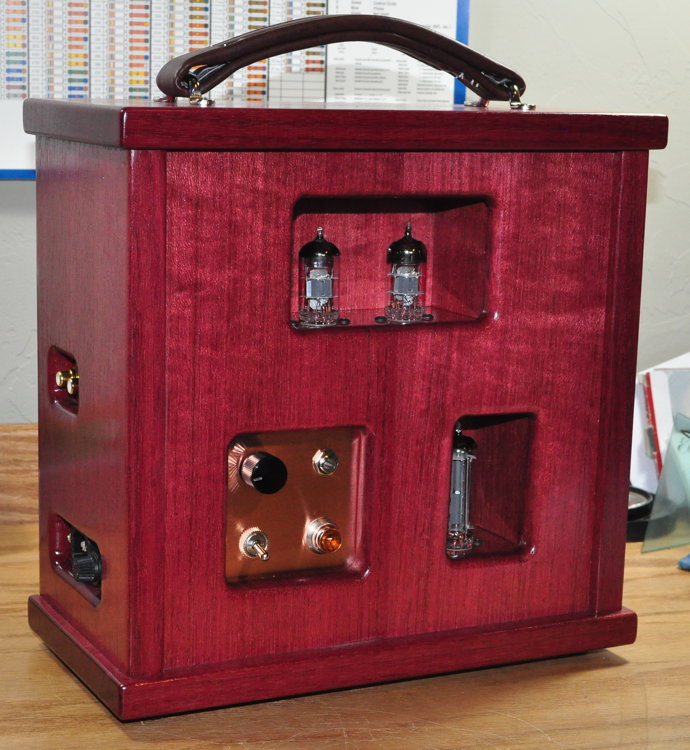
The power and signal inputs are all on the left side of the amp (looking from the front). Here is a shot from the back showing the side panel and the controls on the back.
The ICE power connector and the fuse holder on in the lower cutout and the signal inputs are in the upper one. In this picture the High/Low impedance switch and the power indicator intensity control are also visible on the back.
Impressions
So the only question that remains to be discussed is “How does it sound?” The answer is very good. This amplifier has none of the drawbacks of the others I have built. It works well with several different headphones I’ve tried, the frequency response is excellent, and there is plenty of power to drive all of my headphones to a very high output level.
This was a fun project to build and very satisfying. If you are in the market for a solid and very high performance headphone amplifier, I suggest you give this one a try. You won’t be disappointed!

I made this headphone amp with Audio Note resistors, capacitors, volume pot and choke. I have a Black Gate WKZ as last capacitor in the PSU. I used silver wire and got the transformers from Thermionic lab in Greece. It took a bit money but the sound is amazing. I sold my Musical Fidelity X-Can V3 since it was nothing compared to my build. I’m very happy now.
I’m glad you like the amp. This amp is my favorite of all the headphone amplifiers I’ve tried.
Matt, a question regarding the grounding of the speaker/headphone side of the output transformer.
The amplifier circuits you have designed have a speaker connected to one side of the output transformer and neither terminal on this side is connected to the signal ground.
In Bruce’s schematic above, pin 8 of the output transformer is connected to ground. Would you explain when and why this is necessary?
I just wrote a whole post discussing this issue. It’s located here: https://www.cascadetubes.com/2024/03/03/about-transformer-grounding/
Which line matching transformer would you recommend for 300 ohm headphones?
For 300Ω headphones I would suggest the Edcor XSM 2-1/2W 10kΩ to 600Ω (4.1:1 ratio) matching transformer. This will give a 600Ω output (using the full secondary) and a 150Ω output (using the secondary center tap). Then just choose the one that gives best performance with your headphones.
Because of the CCS loaded differential pair topology, the amplifier is relatively insensitive to output impedance mismatch. Bruce really provided a great design for this unit.
Thanks Matt. Think I’ll build this one for my father as he enjoys music via high-end headphones.
Matt,
I just finished this build and the sound quality is great. I noticed that there is the slightest hum when there is no music playing and even when the volume is at zero. As soon as music starts it is imperceptible, I’m wondering if this is something to be expected with a circuit of this type, or perhaps it has to do with the tube rectification?
I’m glad you like the amp.
As for the hum, most likely it’s something to do with grounding or layout. Tube rectification is actually quieter that solid state, all things considered. Especially with the power supply filter choke. If you know the frequency of the hum it can tell you whether it’s coupling or power supply hum.
Also, sometimes the headphones are so sensitive that they show some hum even with relatively quiet circuits. If this happens, and I can trace it to PS ripple, then I generally add another stage of primary LC filtering to knock it down.
In regards to grounding, I use your approach of one single point connecting the signal ground to the chassis ground. For this circuit, that ended up being the headphone jack. I have a ground wire running from the headphone jack ground terminal to signal ground bus. I’ll email you a photo of the layout. I just thought I’d post the inquiry here for the benefit of others doing the build.
Hi Matt,
This design is simply too intriguing and elegant to ignore. I cannot not build this amp! I’m ordering parts, and have a few questions for you:
The power transformer you specified is the XPWR024. The Edcor website shows that part number having end bells and wires, but your photo shows an open-frame unit with lugs. I prefer the former anyway, so I’m going with that, but want to make sure I’m not ordering the wrong one.
I’m new to the Edcor line, so please pardon my ignorance. Am I correct in assuming the XSM-LD is the same as the XSM but with wires instead of lugs? Again, I prefer that style, so would like to make this substitution unless there’s a downside I’m overlooking.
The original project calls for a TO-92 LM317L, but I see you’re not only using the TO-220 LM317 but with heatsinks as well, leading me to believe the power dissipation might be higher than originally expected. Can you shed any light on this?
And finally, who makes (and/or distributes) those pretty jeweled indicator lamps you’re using?
Your work is truly impressive. You’ve inspired me to do more and better in this hobby.
Regards.
Wow. Lots to unpack here.
Let’s start with the power transformer. Yes the XPWR024 I used was an open frame model. It was all Edcor offered at the time. I believe that it had been sitting in my stash for a while when I built this back in March of 2017. Now Edcor has updated the XPWR024 to having end bells. Go ahead and use the new enclosed version. I actually had to deal with some 60Hz hum because of the open frame transformer. The one with end bells will eliminate this issue.
With respect to the output transformers, you are correct. You may use either the XSM or the XSM-LD, whichever better suits your build needs.
As for the LM317s, you are correct. The original project only calls for the TO-92 version because each regulator only dissipates approximately 31mW. However, I used LM317s from my parts bin and the TO-220 case parts were all I had. I mounted them on some small heatsinks I also had just because I could. You will be fine if you use the original TO-92 case parts.
The jeweled indicator lamps and holders are actually standard on older guitar amplifiers. I generally get mine from Antique Electronic Supply in their Amplifier Parts section.
Let me know how your build goes.
Thank you very much Matt for your quick reply and helpful answers! There’s a long lead time on the transformers, so it may be a while before I actually start building, but I will be happy to report back to you down the road. Cheers!
Just curious, Have you built any CCS designs on standard-sized tube amps?
Only one. I just don’t really care for the sound. However, when using differential pair to drive the output transformer, it corrects almost all the flaws of most other headphone amplifier designs. I still don’t think CCS loads have any place in SE designs.
Thanks for the reply; It seems Heran/OddWatt amps are all PP designs which goes along with your experience.
Matt,
Just curious, what is that metal film resistor that looks like its on the B+ to ground on just one of the channels?
I am assuming you mean this one circled in yellow.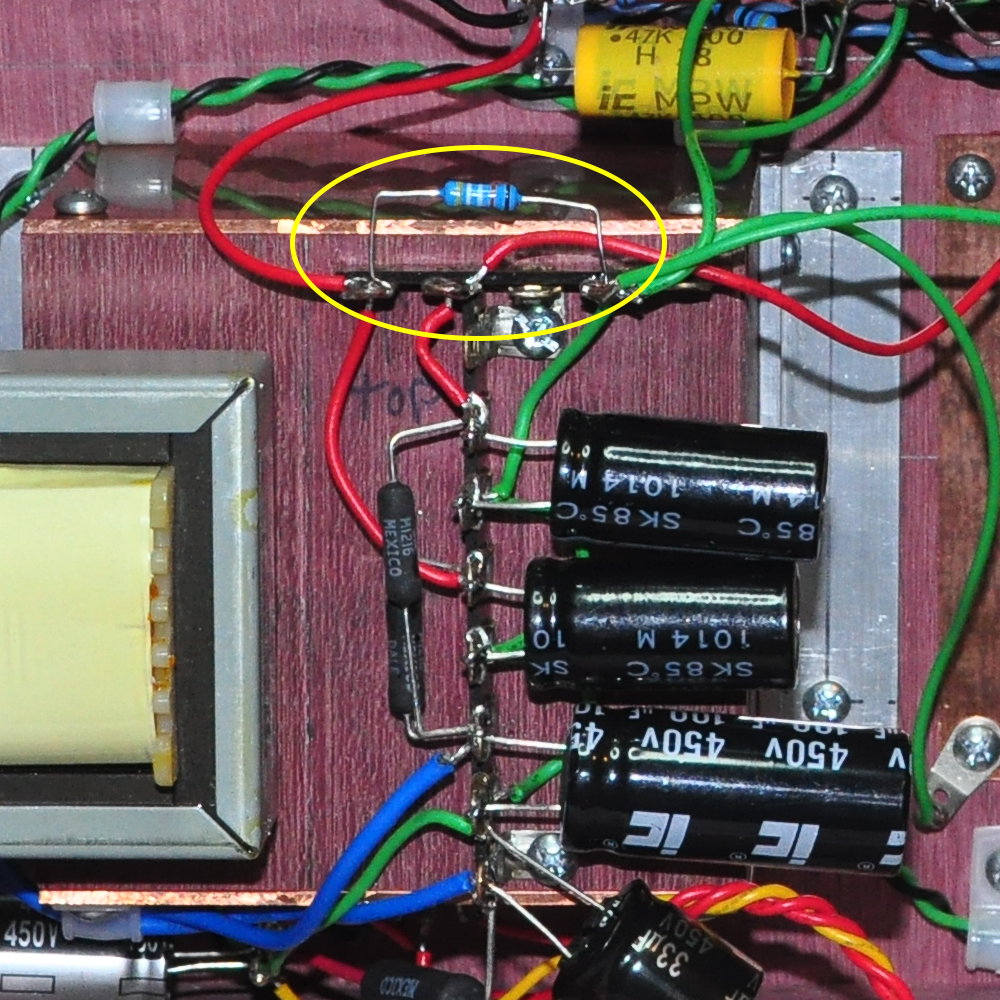 This is a 499kΩ power supply bleeder resistor. This ensures that the power supply capacitors are fully discharged if I ever have to open it up to work on it. It’s a safety feature.
Thanks Matt. Now one more question and I’ll be on my way. I appreciate your time. It looks like you changed the value of the film capacitor on the B+ to the output transformer on Bruce’s design to a 47uf 400v. Am I seeing that value right?
Bruce’s schematic calls for 1.0µF B+ bypass capacitors close to the center taps of the output transformers. I reduced that value to 0.47µF due to the additional filtering in my power supply design. If using Bruce’s power supply design I would stick with his values.
Thanks Matt. I’ll be using your power supply design. It’s all about the glass right.
Matt, I’m ready to build this and enjoy it so much. I have good 22uf, 50uf and 100uf caps but not 33uf. Could I replace those with 22uf or 50uf? Or is this a foolish suggestion and would it change a perfect psu design? Thanks, I love learning tube stuff
Given your available filter caps, here is what I would suggest. Use a 22µf in place of the 47µf right after the rectifier before the dropping resistor. Then replace the other three 33µf caps with 50µf caps. Keep the 100µf cap the same. This will give you a quieter power supply (lower ripple) with greater channel separation. Also, as a bonus, the conduction angle will be longer so your power transformer will run cooler (i.e. because of lower peak currents during the rectification cycle).
Let me know how it goes.
Hi Matt, can I substitute the 500 ohm resistor in the power supply for a 470 or 560 ohm? Also the 50 ohm at the LM317, could that be a 47 or 51 ohm? Thanks again!
The 500Ω in the power supply also sets the final B+ voltage. Since your choke will likely have a different series resistance than mine, choose whatever value for the “500Ω” resistor that gets you close to your desired B+ voltage. Yes you can use a 51Ω instead of the 50Ω to bias the LM317 current source. Just be aware that the total current through the triode pair will be slightly different than mine.
Matt,
Unless I missed it, what was the 8H choke you would recommend, or what Choke did you use?
Unfortunately that specific choke has not been produced in many years. Here’s the backstory “A Tale of Two Chokes”.
I would recommend using either the Triad C-14X 6H choke or the Hammond 159Q 7H choke. Both will work well in the power supply filter.
Good info. Thanks as always Matt. I’ll start getting parts together.
Matt,
Searching for parts I saw a Hammond 193D.
How would this work as the choke? It’s almost the same specs. I know its more money but I like the exposed transformer look. Thanks for your time answering a couple questions.
If you’re going for an end bell choke, then either the Hammond 193D or the Edcor CXC100-7H-150mA will work well in that position.
Thanks as always Matt. I look forward to building this. I’ve done the Marblewood twice and I love the way those sound.
Your Recovery amp also uses 6DJ8 tubes. Do you have a favorite between the two?
This one (Bruce’s design) is by far my favorite.
It has taken years but I have finally stopped trying to build OTL vacuum tube headphone amps. The big output capacitors required are not well suited to the task and modern headphones are particularly sensitive to DC offset. This amp not only sounds better than the recovery amp, it is also a great match for all modern headphones.
Thanks, I ordered the transformers from Edcor and will probably start on the project at the end of the summer.
If I wanted to build a SS PS, would you suggest the design used in “The Rebuild” with a larger inductor?
I would suggest the one Bruce recommended here. I would also suggest using UF diodes for all rectification. Additionally, I would replace the first R1 resistor with an appropriately sized inductor (e.g. 2H to 4H) for better filtration.
Thanks! I have some UF4004 diodes that will work. My transformer is a 180v with a 6.3 heater tap very similar to the 175v one that you used. Bruce’s design had an 8v rectified heater circuit. So, I will probably borrow just the top half of his design with a 3H 100ma choke replacing R1 and use the bottom half of your schematic for the heater power supply. I appreciate the advice.
Neat build! Would the 6N1 tube also work in this circuit? Aka 6H1π-EB it’s a Soviet design useful as a driver tube…
I am not really the one to answer this question as I didn’t design the circuit. You should really address this question to Bruce Heran via the DIYAudioProjects project thread (http://diyaudioprojects.com/Forum/viewtopic.php?f=9&t=4161). However, I would be dubious of this substitution without some modification. See this article for more information: https://en.wikipedia.org/wiki/6N1P
Sounds about right. Love your work. Are you tinkering with 6L6 in UL mode for an amp project? I wanna build that.
Yup. 6L6 UL is coming but it’s still a couple of projects down the list.
Dear Matt,
I’m in the process of building this small amp. I have inherited a bunch of russian 6N6Pi (ECC99). Is there a chance to use them in this project, and do I need to adapt some values ?
Thanks for your help !
This is so good and looks lovely..
Matt,
I really like your design. Your amps continue to look unique, interesting, and aesthetically pleasing. I especially like the design of the case. Thank-you for continuing to share your creativity and experience. Additionally, it is good to see some of the solid state techniques applied to tubes. Constant current sources, differential inputs with feedback to lower harmonic distortion, and for designs without audio output transformers (current mirrors for loads) all make good sense to me.
Terry.
Beautiful !!!