A Historic Turn of Events
 A very interesting thing happened in the electronics industry during the middle of the 1970s. This was a time of great turmoil of which few people were aware. The mighty vacuum tube had been the mainstay of the electronics industry for over 65 years. It was the technology that had helped win World War II. It was the technology that had put men on the moon. It was the key technology which had brought ease, connivence, and comfort to millions of people. Virtually every element of industrialization and modernization had been built on the vacuum tube. It was also a doomed technology.
Back in 1947 a team of American physicists named John Bardeen, Walter Brattain, and William Shockley had developed an interesting little device called the transistor. While the mighty vacuum tube was bringing earth shaking changes to the lives of millions, it’s replacement was steadily studied and improved. By the middle of the 1950s, products utilizing the transistor began to emerge. But the technology was new, expensive, and not highly reliable. So the vacuum tube marched on as the electronics technology of choice for most consumer products. Slowly but surely, transistors improved and gained ground. By 1970 it was much cheaper, much more reliable, and making inroads in almost every area.
At this time, one of the last remaining hold outs of the vacuum tube was the television. The very high voltages and the power required for television picture tube circuits were an ideal fit for the inexpensive vacuum tubes and were difficult areas for transistors conquer. At the same time televisions had undergone a major evolution. The large oak and walnut cabinets of the 1950s had given way to lighter and easier to manufacture materials. And televisions had gotten much cheaper. As such, the number of televisions per household was increasing rapidly. Virtually every American household had at least one television and many had more. Sales were booming! So the manufactures did the only thing they could to keep up. They ordered millions of vacuum tubes from suppliers to meet the ever increasing demand.
They it happened. Almost overnight, the price of transistors plummeted and their reliability soared. New break throughs in the application of transistors were happening daily. And the burgeoning Japanese electronics industry fully embraced the new technology. In order to compete, television manufacturers were forced to abandon the tubes and embrace the new technology. The virtual death of the vacuum tube had arrived.
The Opportunity
However, there was a catch. The industrial supply lines were full of vacuum tubes. There were warehouses filled with millions upon millions of vacuum tubes destined for televisions which were now being built with transistors. These tubes were sold for scrap. Millions were destroyed; melted down for the metals and glass of which they were made. However, millions were also bought up by entrepreneurs, romantics, and mass collectors. They have been held for years and are still stacked high in old warehouses across the US. And they are now for sale. Thanks to the internet (another gift from the transistor) these tubes are now being made available to people who can make use of them. And this is were we come back to this project.
This amplifier is based on a tube intended to drive the vertical deflection circuits in larger televisions, the 6EM7. It has two dissimilar triodes in one envelope. One is a high gain, low power unit intended as an amplifier or oscillator, and the other is a higher power unit intended to drive the magnetic deflection coils on the back of a CRT. At audio frequencies the combination is just what we need to build a nice little audio amplifier. One tube per channel. And there are many thousands of these tubes and tubes like them readily available today.
The Electrical Design
When using one of these tubes obviously there is no option to make substitutions. As such, the key to a good design is to understand the differences between the triode units and to make the most of the characteristics of each.
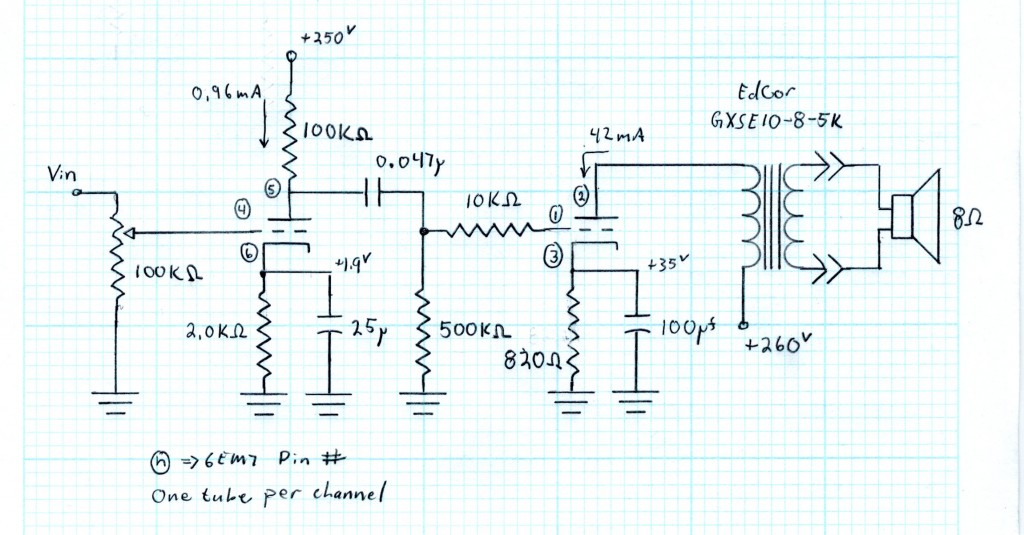
Section 1 of the 6EM7 is a very linear high gain triode. Section 2 is a low gain high power triode. As such, section one becomes the signal amplifier and driver, and sec 2 becomes the amplifier power stage. Below is the simple schematic for this amplifier.
Each channel only requires one tube making for a very simple design. The power supply uses a “split rail” design which provides independent filtering for the left and right channels. The helps provide good channel separation and a nice wide sound stage.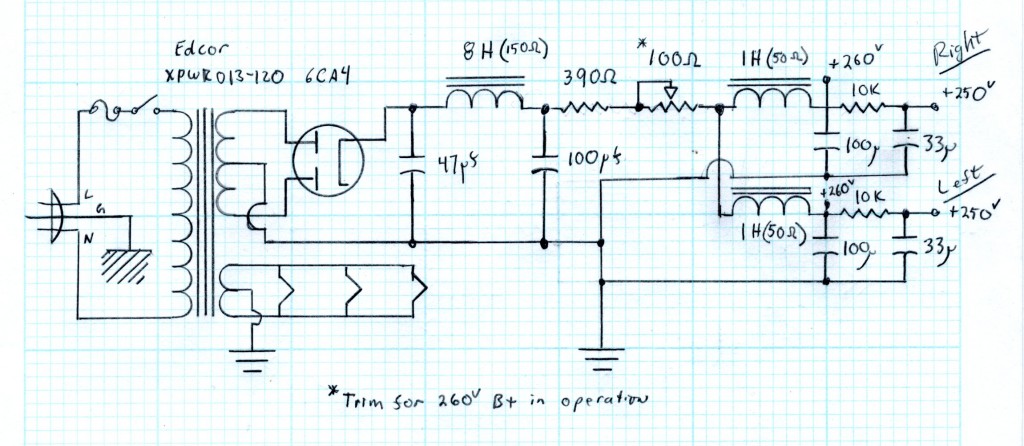
This design uses section 1 as a single ended triode voltage amplifier with a gain of about 32dBv to drive section 2 as a single ended voltage amplifier. The peak output power is about 2Watts per channel. With the volume control at max, it requires about 0.88v peak to drive the amplifier to full power. Most small devices like iPods, phones, and portable CD players will easily drive this amplifier.
The Build
What really drove me to build this amp was an idea about amplifier layout. Looking back at most of my designs, and most of those on the internet, revealed a very typical pattern. Amplifiers tended to be flat chassises with tubes and transformers above and electronics below. From a historical perspective this makes perfect sense. Metal chassis were built this way to facilitate packaging and assembly. When people started to make tube amplifiers again, they just removed the upper case and built in the same way.
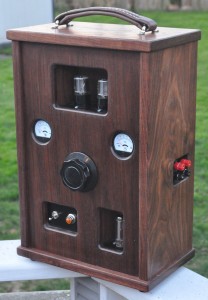
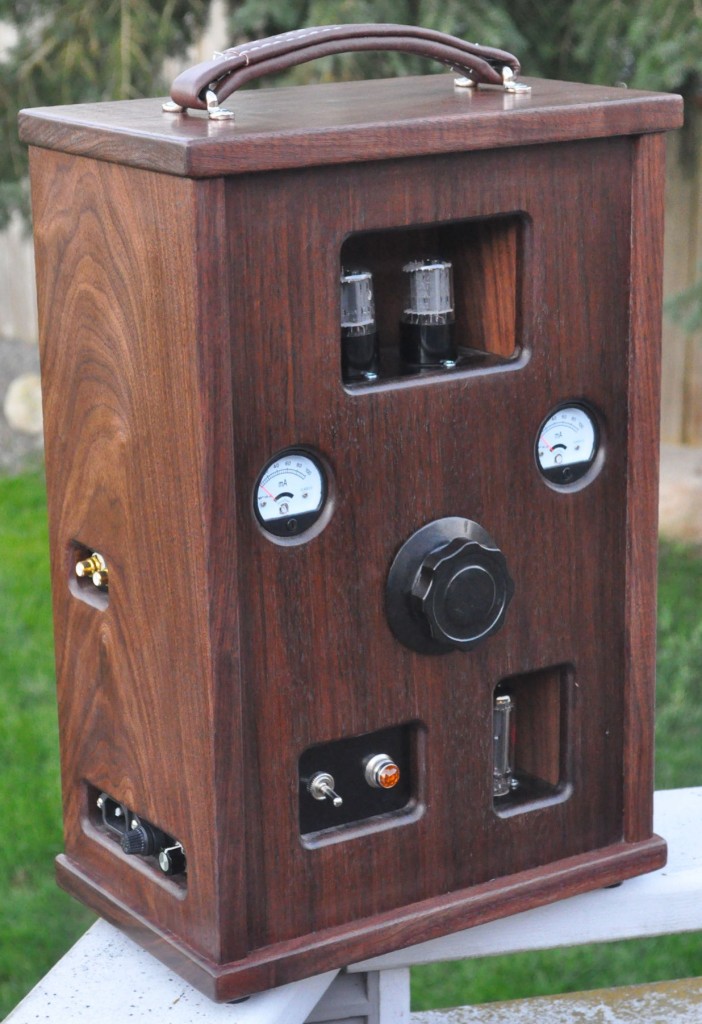
But I wanted something a little different. I wanted a case design that would really showcase the tubes and hide the rest of the electronics. I also wanted a more old time look. Something that harkened back to early tube equipment of the 1920s. My primary design elements were shadow box alcoves for the tubes themselves, panel meters for monitoring operation, large old style controls, a jeweled power indicator, and a nice accent of leather in the handle to showcase portability.
I started by choosing a nice dark walnut that would reflect the early tube equipment of the 1920s. From here I decided to go in an entirely different direction; vertical. By making this decision, the amplifier footprint becomes much smaller, and the tubes can be showcased at different levels. Here is a view of the chassis dry fit prior to glueing, sitting on my work bench. This was going to be something totally different from anything which I had built before.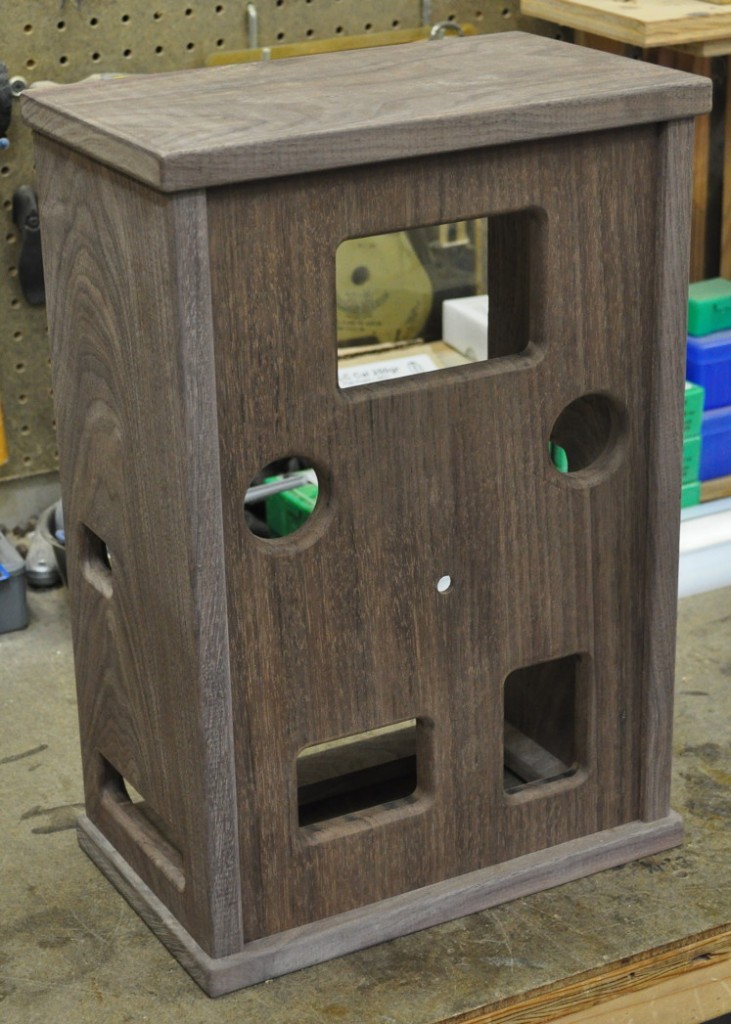
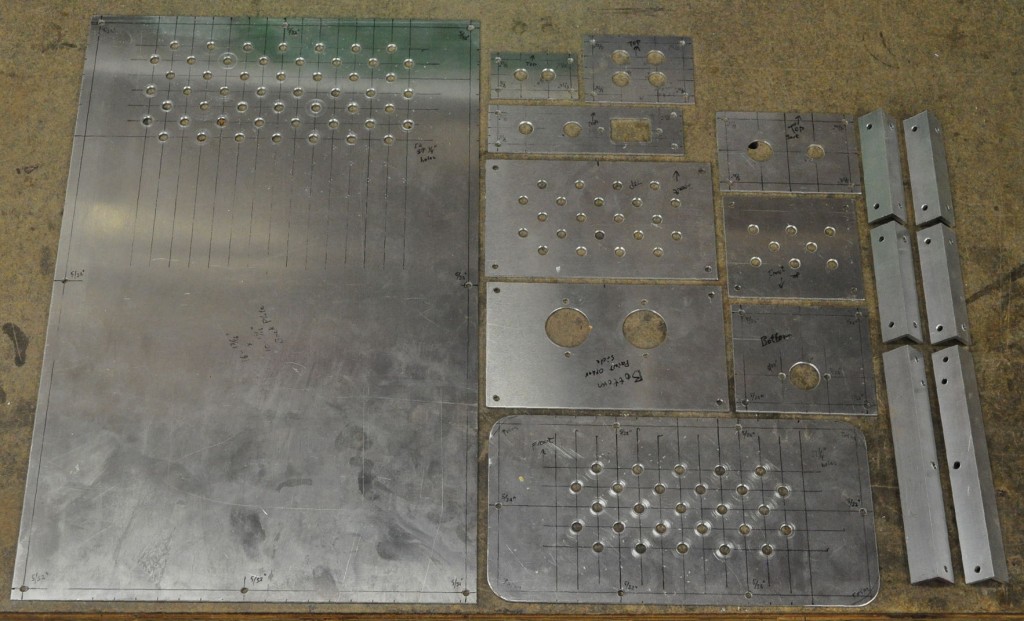
From here I took to fitting all the various elements together. I settled on black metal accents for all the component mounting surfaces as well as the bottom and back covers. This translated in to a fair amount of metal plate. Here are all the metal parts, cut and drilled, prior to final finishing and painting.
Here can also be seen the pieces of aluminum angle which are used to mount the wood alcoves into which the tubes are mounted and the long set which hold the power transformer suspended over the bottom access hole. Here is a picture showing how major assemblies fit in the chassis. In this picture the primary power supply filter components have also been mounted.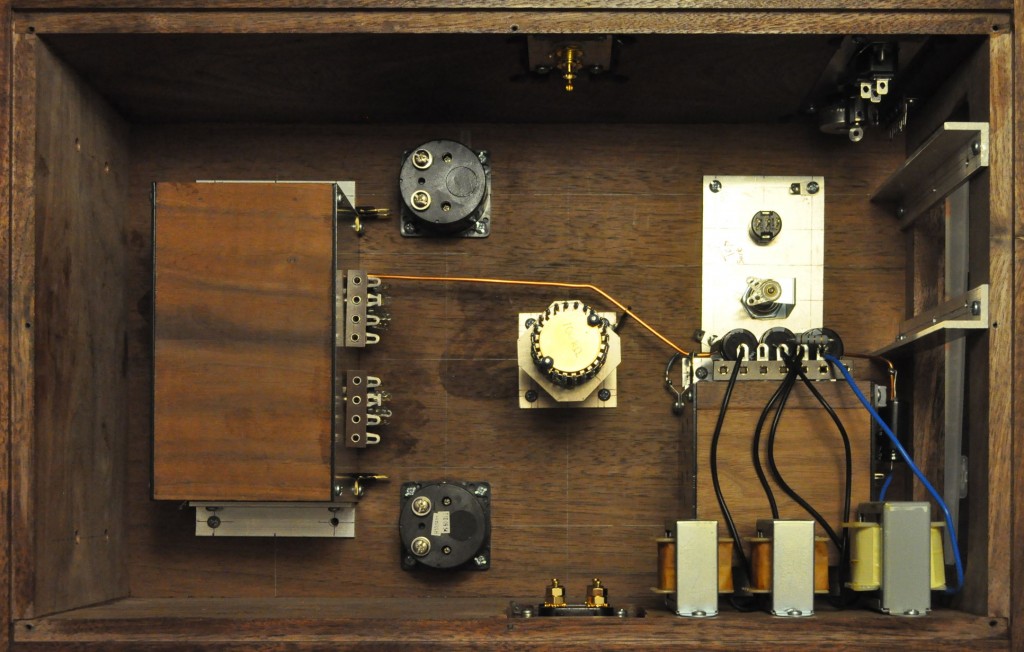
The bottom access plate (to the right in this photo) is necessary to wire up the bottom side of the rectifier socket and the power transformer. In order to wire the primary amplifier I removed the upper tube assembly and wired up the two amplifier stages outside of the chassis. This way all that was left was connecting a few wires to the assembly. Here is a picture of the wired 6EM7 assembly prior to installation in the main chassis. 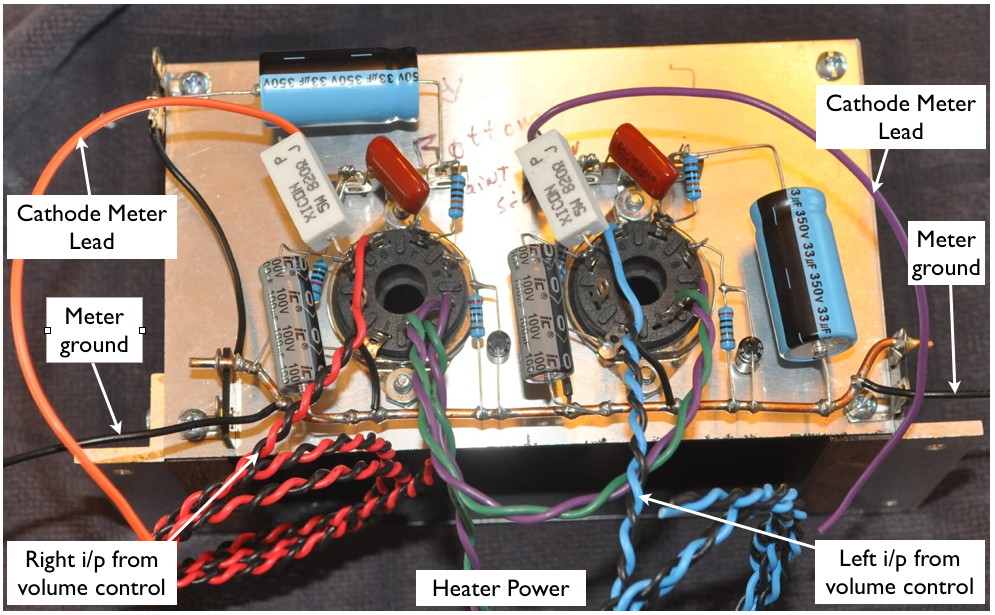
By installing all the major wires to the assembly, it minimizes the number of connections that have to be made with the unit installed. Finally here is the inside of the chassis with everything wired up and ready to go. The inclusion of the power transformer and three filter chokes at the base of the chassis make this a very stable build that is in no way top heavy or prone to tipping.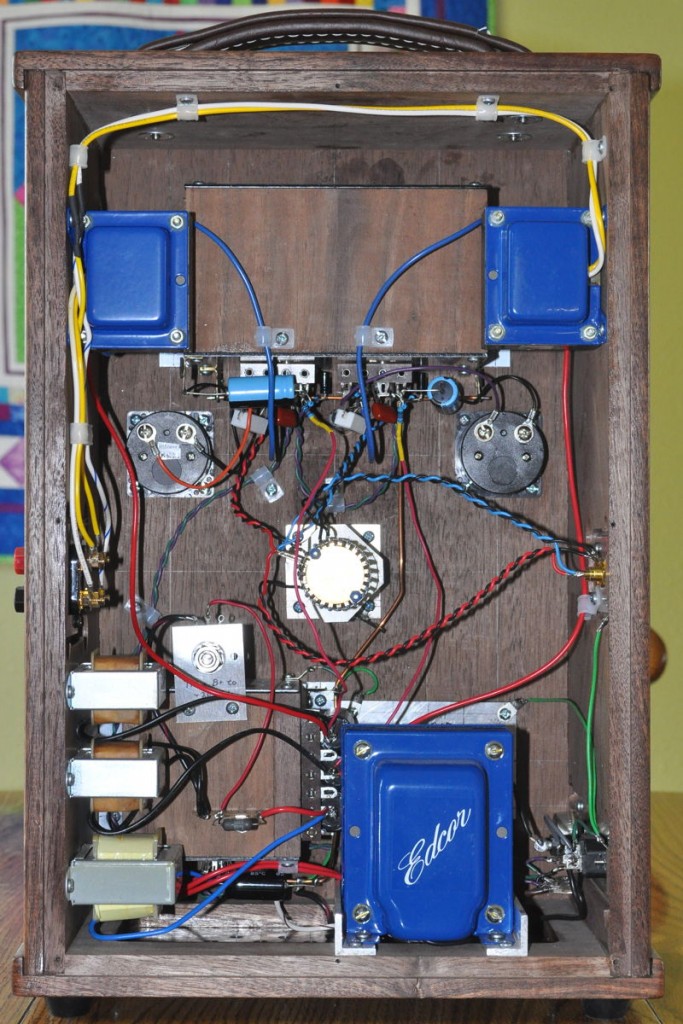
The adjustment control on the back of the rectifier housing is actually a B+ voltage trimmer to keep the dissipation of the power stage plate circuits within acceptable limits.
The Test
I didn’t submit this amp to a lot of formal testing. This design (or variations thereof) has been built by many different people since I first developed the electrical design back in September 2011. And then revised it in December 2013. The clean output power is slightly over two watts per channel and the frequency response is consistent with the advertised performance of the output transformer (40Hz to 18kHz).
The amp sounds wonderful! There is really nothing which can compare to the sound of a single ended triode amplifier. Bass is well articulated without being boomy, mid-tones are clear and even, and the highs are crystal clear. The amp has exceptional transient response; reproducing my favorite classical recorder piece (“Frederick The Great : Sonata in B-Flat – Allegro” performed by Michala Petri) with clarity, lightness, and vibrancy.
It is a success on two different accounts. First, the electrical design and execution has resulted in a fine sounding amplifier. And second, the physical design of the amp, with it’s different approach to showcasing the tubes, has resulted in a unique and beautiful amplifier with just the early 20th century feel which I wanted.
Some Design Postscripts
There are two additional items about this amplifier which are worthy of note. The first is its thermal design. With the tubes contained in small cubby holes, there was some concern with respect to overall heating of the tubes and chassis. This is especially true with the power tubes where the quiescent power dissipation is over 32 watts. The design approach was to have the tops of the compartment ventilated with holes. The thought was that the air flow pattern would be in through the front, through the vent holes into the chassis, up through the inside of the chassis, and out the vent holes in the chassis back. This would create a convection cooling flow which would keep chassis heating down.
This approach was successful in the lower rectifier compartment where peak dissipation was less than 8 watts. In the upper compartment the design is just marginal. The heat load due to direct infrared radiation was not fully appreciated. The tubes themselves still remain well below their maximum bulb temperature. The impact is on the chassis itself. The black top plate on the power tube compartment has an equilibrium temperature of approximately 156°F (≈ 69°C) in normal operation. This is still well below my standard internal chassis derating temperature of 185°F (≈ 85°C) but it is still higher than I would like. If using this design approach again, I will endeavor to keep these temperatures somewhat lower through larger compartment size, better ventilation, and perhaps the use of a higher emissivity finish on the metal parts.
The other design item of note is a small addition I made to the design. Looking at the side of the amp revels a little control knob right next to the fuse holder. This control has a special purpose.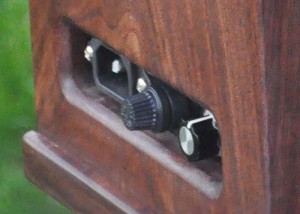
When building up this amp I decided to use a jewel power indicator with a typical 6.3v indicator bulb. However, when testing out the various design elements I decided that even the 0.5 candela type 47 bulb (6.3v @ 150mA) was far too bright. However I did find that the 0.9 candela type 44 (6.3v @ 250mA) could be dimmed across a large portion of it’s range by a simple 50Ω variable resistance. So a small 50Ω, 5W wire wound rheostat was put in line with the indicator to taylor its intensity to match the glow of the tubes. It is purely an esthetic addition to the amp but it is one of those little things that can make a piece of equipment just “look right”.

Hi Matt,
I’ve asked you before, and you’ve answered, but cannot find the post anywhere on the forum and believe me…… I’ve spent hours looking. Could you tell me the current draw for the 6EM7 vertical amp and the current draw for the line amp/baxandall tone stack.
How is your daughters house coming along?
John;
Currents for the 6EM7 are listed on the schematic above. The power stage is 42mA per side. Signal stage is ≈1mA per stage. Total draw is 2*42mA+2*1mA = 86mA total (plus whatever is dissipated by the PS bleeder resistor).
For the tone stack, it depends on which way you build it. It will be “small”. On the order of <10mA total. The design I have is for a 300V B+ using a CF->TS->4S topology. But the B+ in the 6EM7 amp is more like 260V. If your want to integrate the two, then I would suggest changing the CF load to 50kΩ and the CF bias resistor to 1kΩ. This will give excellent CF performance at the lower B+ voltage. The original CF draw was 1.53mA/stage with the 5kΩ/100kΩ configuration. Going to the new values (1kΩ/50kΩ) will increase the draw to about 2.22mA at a B+ of 250V. But the stage will preform much better at that voltage. The 4S draws will depend on the tube but (if cascaded) I would strongly suggest using only the 12AU7 in that slot.
Does this make sense?
Thanks Matt, Yes, all makes sense. I’m thinking of the Hammond 370EX power transformer 550V @ 144mA. and 6.3V @ 4A. They make a 520V @ 104mA but it only has 3.5A on the 6.3V. I need 3.6A to run the five valves. It also has multiple primaries allowing me to build and test at 230V (Spain) and then send to friend in USA. Any more advice welcome.
Hi Matt, Sorry to keep asking advice, just making sure I don’t do anything daft. With the 550V transformer I’m getting about 370V on the power supply out, so need to drop approx 110V. With the amp and tone stack drawing approx 105mA, I’ve calculated 1k ohm 12W dropping resistor. So 1k ohm 15W to be on the safe side. Sound okay?
Sorry, that should read……an additional 1k resistor.
That voltage, 370v, doesn’t look right. 550/2*1.414=388v. Your figure of 370v is just about 4.5% below absolute peak.
Are you measuring the voltage under load? Total load for the 6EM7 at design point is ≈86mA for both channels. This is roughly a 3kΩ effective load on the power supply. Just the rectifier drop at 86mA should get you below the 370v number.
Do you have a sketch of your power supply schematic?
Hi Matt, Thanks for quick reply. As usual I explained myself badly. I’m using your power supply schematic for the 6EM7 amp but with the larger transformer. With the higher voltage I need a larger dropping resistor than the 390 ohm resistor in your schematic. I was trying to calculate that resistor. I’ve powered up the power supply with no load, just to check it was working okay before I start wiring the amp.
In order to calculate the resistor you’ll need to prototype the PS under load. The target load is 86mA @ 260V which is about 22.4W.
You can also do it experimentally with an initial approximation. All things being equal, your transformer should produce an additional voltage of about ((550v-510v)/2)*SQRT(2)≈28v. At 86mA the resistor required would be 28v/0.86mA≈330Ω. The power level would be 0.086^2*330Ω≈2.5W. Since I started with a 390Ω, I’d add them and initially try a 750Ω@6W dropping resistor in that slot. This should get you close.
Here is a jig I use a lot when adjusting resistances like dropping resistors or varying power stage cathode loads.
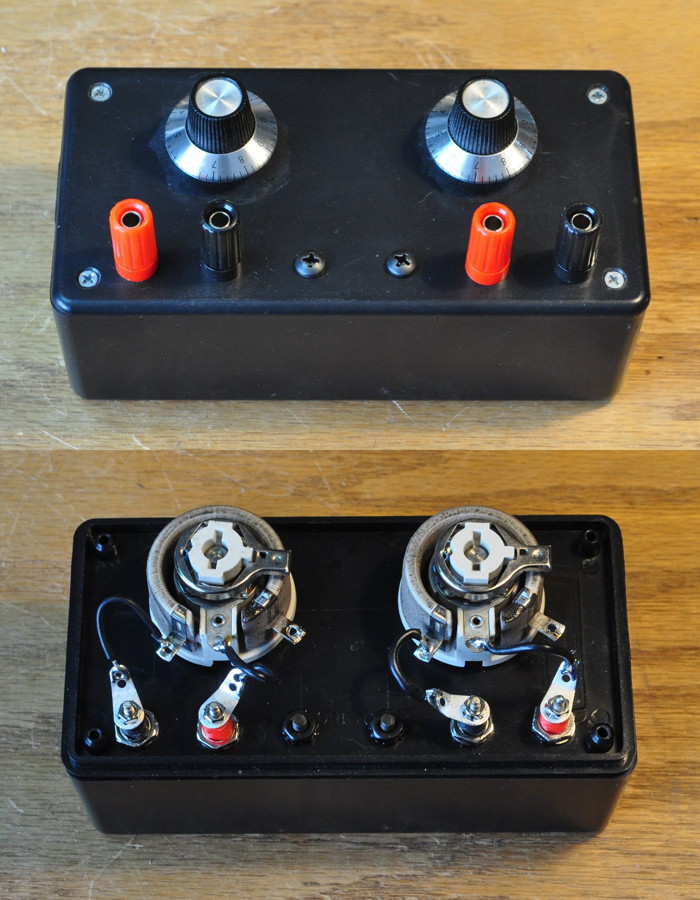
It’s just two 1kΩ 25W rheostats mounted in a box. These are good for a maximum of about 158mA each. This allows me to simply dial in a value and then measure the resistance. It works really well for setting dropping resistors for small amps.
Thanks Matt, Math is obviously not my strong point.
Yet another great jig.
Hi Matt, Just to let you know that the project is finished The 6EM7 with line amp tone stack.
Just one question….. both ammeters show 45 milliamps not 42. Does the tone stack affect the current draw?
Great! How does it sound?
The biggest driver in power stage current draw is the B+ voltage. Depending on the tubes and the components involved, 45mA verses 42mA in not out of the question. I would check the actual current through the cathode resistors and see how close that falls to what the meters say. Some meters are better than others. I’m assuming that they were properly zeroed of course.
Ammeters are properly zeroed, I’ll test the current draw through the cathode resistors later today. The Amp/Tone stack combination sounds really nice. I’m really pleased with it.
Only one thing I’d like to alter if possible. The bass control at its maximum distorts the sound and it becomes boomy and drowns out the high frequencies (last 10th of a turn). Volume level makes no difference, also the ammeters fluctuate about 1mA when this happens. I would never use that much extra bass so it doesn’t affect my listening pleasure at all. As this unit is for a friend, I would like to make it as perfect as possible.
I’m using a 6V6 v.2. with tone stack (your design) at the moment. Exactly the same happens. Not a speaker problem as far as I can tell. I’ve tried four different pairs of speakers always with the same result.
From what you describe and from the fact that it the behavior follows to another amp, I am suspecting an overdrive condition in the tone stack recovery stage. It sounds like this is leading to motor-boating across the tone stack buffer and recovery stages. First step would be to decouple the B+ between those two stages with another >20dB of isolation.
Hi Matt, last question, I promise. The 550V transformer that I’m using had 100V, 110V and 120V primary tappings. I used the 120V tapping as I have read that USA domestic mains voltage is 120V +/- 5%. I have a 390 ohm 10W dropping resistor in at the moment and no trim pot. If I set the variac to 114V, I get a perfect 260V and 250V for Bp and Bs. Ammeters read 42mA on both channels. I want to put a trim pot on the back panel so my friend can adjust for the voltage where he is using the equipment, using the ammeters for guidance. Could you advise me on resistance and power handling for this pot. I’m guessing that the 114V using the 390 ohm resistor is as low as typical USA mains voltage would go.
This is an easy answer. You are correct that since the amp balances with 114 Vac mains input, you are looking for a way to reduce B+ voltage if the mains voltage increases. Mains in the US are targeted at 120 Vac but can vary. I just checked my mains voltage and it was 123.6 Vac. This is pretty typical for me. So you just need to add a variable dropping rheostat in series with your 390Ω power resistor.
The first important point of data is that the total draw for the 6EM7 amp is about 86mA. Second point is to note that potentiometers are really rated for current and not for power. For example, a 500Ω, 5W potentiometer is really rated for SQRT(5W/500Ω)≈100mA. So you need to make sure you choose a potentiometer that a) can handle the ≈86mA (plus margin) of current the amp draws and b) one that gives you a reasonable adjustment range.
For example, a 250Ω potentiometer will give approximately 250Ω*0.086mA≈21.5v (V=I*R) of adjustment. This may not be enough adjustment range for your amp. A mains voltage jump from 114Vac to 125Vac is about 10%. But with a 260V B+, 10% is ≈26v. So you need more adjustment range. I would recommend the 500Ω value.
Now a typical power value for small potentiometers in this class is 2W or 5W. A 500Ω, 2W potentiometer can only handle SQRT(2W/500Ω)≈63mA. This is underrated. However a 500Ω, 5W potentiometer can handle SQRT(5W/500Ω)≈100mA. This is plenty of margin (≈15%) and will keep the pot running cool regardless of setting.
So I recommend a 5000Ω, 5W wire wound potentiometer. Personally I would use a CTS 026TB32R501B1B1 potentiometer. I don’t know how much they are for you, but here in the US they are currently $9.63 USD from the Mouser website.
I hope this helps.
Thanks Matt, as I’ve said before maths is not my strong point, but I am taking note of the way you arrive at a final figure and jotting everything down in my notebook. I will be able to arrive at these final figures on my own I’m sure, just need a little more practice.
Hi Matt, The 500 ohm 5W pot works great. I can trim to 42mA from any mains voltage between 114V and 126V. I’ve built two of these amps at the same time, so working with four 6EM7 valves. One is obviously bad so have ordered another. I’ve tried it in all four different valve sockets and when set to 42mA on the good valves it runs at 50mA and would probably climb a little more if I let it. It creeps about 1mA a minute. Can you give me an idea on what is happening just out curiosity?
My best guess is that the cathode in the bad tube has developed hot spots. This is usually due to nonuniform activation of the emitter. And it can take hundreds of hours to manifest. Since the temperature of the cathode in increased by the current flow through the resistive oxide layer, the temperature becomes highest where the emission is highest. This causes increased emission at the hot spots. The positive feedback of increased temperature and increased emission is cumulative and makes the emission current begin to increase with time as the temperature of the hot spots increase. This increased emission can even overcome the space charge and lead to current runaway in extreme cases. Bottom line, the cathode is at end of life.
Hi Matt, Regarding the in phase, or out of phase power transformer windings (6.3v) on the forum for the 6EM7(momoblock version).
After your suggestion to change the windings wiring, both monoblocks a running fine now. Whisper quiet and no100R resistors going open circuit. The conversation on the forum died an unsatisfactory death with no explanation as to why the phase change made a difference.
In the end I thought I’d just forget it as the problem seemed solved. But I can’t. I keep looking up everything I can about transformer phasing, but can’t seem to find anything that sheds light on it.
Rather than go out of my mind, I thought I’d ask you for a simple explanation if possible, or could you point me towards something I could read.
This is a tricky proposition as it involves not the theoretical transformer relations, but the real world actualities.
The two windings you put in series were a different number of turns (5.5v and 4.5v). In phase this should produce a sine wave voltage about 10V-rms. Now the mathematical approach, if you wire them 180 degrees out-of-phase tells you that you’ll get a sine wave of 1V-rms. The problems arise because this ignores what is happening in the magnetic core circuit and the coupling with the HV winding. Since the high currents in the filament windings are bucking each other, this upsets the core circuit flux which is coupled to the HV winding. Since the center tap of the HV winding is tied to ground, this is the “ground reference” to which the heater filaments are tied through 100Ω resistors. But the heavy flux disruptions can cause the relative difference between the filament windings and this “ground” to vary by many volts due to the large number of HV secondary winding. This delta voltage leads to large currents in the 100Ω resistors and causes them to dissipate much more power than expected.
Bad things happen to transformers where windings are out of phase. Regardless, I am glad that the problem is fixed now.
Hi Matt, Thanks for the reply. To clarify: When I first series wired the two windings, I had four choices to try as there was no way to identify which wire in each pair was the “start “ of the winding. Two that gave me 10v and two that gave me 1v. Once I had 10v I carried in with wiring the power supply. Are you saying that only one of the two choices giving me 10v is correct?
Sorry if I’m being a bit dense on this.
Only one of the combinations (true series wiring) is the correct one.The one that gives 1v is the issue. Since I don’t know how you wired the two mono-blocks, I’m not sure what exactly happened. But I suspect that there is a phase delta between the two windings and this is also complicating matters. The only thing that really matters is once the phase is correct, things should settle down.
It would be interesting to check the phase of the currents through the two 100Ω resistors and see if they are exactly 180° out of phase, or if there is some residual phase lag. If you have a dual channel oscilloscope handy, this would be an interesting test.
Hi DIY builders. I have built a true dual mono of this amp and absolutely love the sound, the main reason being that I have a boatload of parts that I picked from a yard sale.
The amp is dead silent even with the volume turned up and listening to Jazz and RnB on it is sheer bliss.
Thanks.
Helio! I am writing from Argentina! Great Job! Incredible amps! I want to know if you make the meditions of THD, wattage, bias, and technical issues of the amp.
I will like to make it, and i will like to know that! Thanks to you and greetings!!!
I’m glad you like the designs. There is more technical information on this amp available at DIY Audio Projects and at DIY Audio Projects Fourm. I hope this helps.
Hello!! It is wonderful to see your assemblies, this one especially calls my attention, today I have got the tubes and some components. I hope that soon I can tell you the results that I get with my first valve amplifier 😨. I also want to ask you about the milliamperimeters, what is the full scale measure? .
A greeting. Luis.
Here is a closeup of the meter I used.
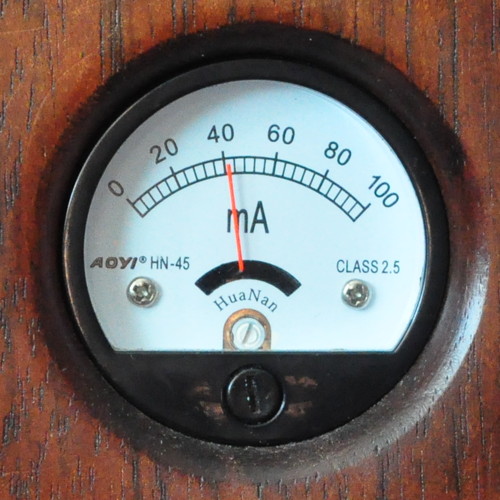
This is about the most current it ever reads. I chose the meter scale (0mA to 100mA) so that the indicator needles would be somewhere near the middle in operation.
Hi Matt,
I’m playing with different types of speaker cabinets with the Vertical Amp at the moment and so far have stuck with 8 ohms. I’d like to try some combinations in series and parallel. Will 4 or 16 ohm combinations create problems for the amp? I’ve read so many conflicting opinions that asking the amp designer seems to be the best way to go. By the way, the amp sounds beautiful with Fostex back loaded horns.
Neither will cause a problem but there will be significant differences in performance. The 16Ω load will reflect about a 10kΩ load on the power stage. This will significantly reduce the output power but the 2nd order distortion will be lower. The 4Ω load will reflect about a 2.5kΩ load to the power stage. This is pretty low. I think that the output power will be roughly the same (just from a quick check of the load line), but the 2nd order distortion will be higher.
In any case, the amp will not be harmed if you do try out different loadings.
Hi Matt,
I’m just about ready to start this project which, by the way, looks beautiful. Having read so many posts on wire size I’ve bought solid 20 AWG rated at 300V for the heaters and solid 22 AWG rated at 1000Vfor everything else. Am I alright with these?
The wiring in your photos looks heavier.
Regards John.
p.s. You gave me a load of info on the lacewood amp, but I decided to go for this one as a first project.
John; Those wire sizes are more than adequate.
I generally use 22AWG/300v stranded wire for all my signal and power wiring and 20AWG/300v solid (solid, just because it stays in place better) for heater wiring. The thing to remember about wire voltage ratings is that those numbers are plenum max voltages. These are the maximum recommended voltages to meet lifetime requirements if the wires are laid in a metal plenum at zero volts. As that’s not how chassis are wired, it doesn’t matter if your B+ is a little higher. I don’t worry about wire insulation type, in point to point wiring situations, until the B+ exceeds 600V. An then only for very specific leads.
Matt,
I stumbled across your amp the other day and absolutely loved it. Would you mind if I asked where you usually get your transformers from?
Dave;
In general I get most of my transformers and chokes from one of three sources. Edcor sells direct so all their iron comes directly from the manufacturer website (http://www.Edcorusa.com). Hammond has a great line of iron. These I generally buy from the Antique Electronics Supply website (http://www.tubesandmore.com). And finally there are some really good power chokes made by Triad. These I generally get from Allied Electronics (http://www.alliedelec.com) or from Mouser Electronics (http://www.mouser.com). I hope this helps.
Matt
Thank you so very much! It absolutely helps!
Matt,
I love the amp! It is a work of art.
Thank you. I’m glad you like the design.